You will now be prompted as to whether you want the login shell to be accessible over serial, select No with your arrow keys and press Enter to proceed. I observe the output on the oscilloscope, and the UART signal is generated successfully with a baud-rate of 10Mbps! If you have any solution and share it, Ill very happy. With the next screen you will want to use the arrow keys again to select P6 Serial, press Enter once highlighted to select this option. Once you have finished writing the serial_write.py script it should look somewhat like what is displayed below. To subscribe to this RSS feed, copy and paste this URL into your RSS reader. I am hooking the uart from the pi3 to the uart (cross wiring) of a microcontroller that outputs bit mapped sampled ADC outputs. Now that we know what our USB device is attached, we can proceed with programming our two scripts. Error when setting 4000000 UART Baud rate at RPI 4, raspberry pi zero 2 w: use PL011 UART and log on to linux over wifi simultaneously. Convert all small words (2-3 characters) to upper case with awk or sed. This piece of code is very simple. The best answers are voted up and rise to the top, Start here for a quick overview of the site, Detailed answers to any questions you might have, Discuss the workings and policies of this site, Learn more about Stack Overflow the company. Your email address will not be published. Why are the products of Grignard reaction on an alpha-chiral ketone diastereomers rather than a racemate? Anything after that will be rejected. To start off we will be writing our own serial write script, go to the next section to learn how to do serial writes in Python. Asking for help, clarification, or responding to other answers. 2. You only need to specify the COM port and speed since Putty uses the same parameters above by default: Heres what to do if you dont know what COM port number youre USB Serial Cable is assigned to: 1. document.getElementById( "ak_js_1" ).setAttribute( "value", ( new Date() ).getTime() ); Disclaimer & Privacy Policy | About us | Contact, Build your own Raspberry Pi Mumble Server, Installing Mathematica on the Raspberry Pi, Raspberry Pi Distance Sensor using the HC-SR04. The Raspberry Pi UART transmit (TXD) and receive (RXD) pins are assigned to GPIO14 and GPIO15 respectively: Note that these pins use 3.3V logic levels so you cant connect them directly to devices that uses 5V like an Arduino UNO or a PC. The serial port is a common way to talk to devices and is a feature that most microcontrollers and computers have. My switch going to the bathroom light is registering 120 V when the switch is off. By clicking Post Your Answer, you agree to our terms of service, privacy policy and cookie policy. to your desired baud rate), 2:23:respawn:/sbin/getty -L ttyAMA0 115200 vt100. In our case this was ttyUSB0, remember to change this if you got a different result earlier on in this Raspberry Pi serial read and write tutorial. Once everything is ready, click the Open button on Putty to use the Linux console via UART! This tool allows us to make quite a numerous amount of different changes to the Raspberry Pis configuration, for now, though we are only after one particular option. ser.write(Hello\n) ser.write(bHello\n), Your email address will not be published. What organelles(parts of a cell) did early cells most likely have? 1.While using debug console, there is system startup information on the screen, but the keyboard cannot be used to input text? 1. The point being, make sure your RS 232 to TTL converter is converting the RS232 signal levels to 3.3 volts, not 5 volts. and, remember to watch your pin voltages to avoid damage to you Pi. This tool will allow us to easily disable the serial input/output interface that is enabled by default. There is also a more fully featured UART with bigger buffers, I haven't found the minimum/maximum speed for it yet. You can connect the wires directly to the GPIO Pins or use the breadboard as a middleman as we did in this tutorial. First, we need to write the serial_read.py script. The second import isserial. 58,916 Views. Whichever UART is assigned to the Linux console is accessible through /dev/serial0. Receive our Raspberry Pi projects, coding tutorials, Linux guides and more! How to change the default baudrate of raspberry pi's serial port? should find a line like the following with the baudrate of 115200, change that 3. 4. rs232 pi serial interface raspberry shifter level port revisit options adapter ttl db9 via communication Use the arrow keys to go down and select 5 Interfacing Options. I have read that using 5 volt TTL levels will damage the inputs. Is it possible to turn rockets without fuel just like in KSP. It means that any script or device listening on the other side will continually receive that text. The driver for this cable can be downloaded from Prolifics download page. 468). By default, the Pis UART uses the following parameters: 115200 baud, 8 bits, no parity, 1 stop bit and no flow control. Here I used Pythons serial library which is one of the built-in libraries. Each UART can be accessed individually via /dev/ttyS0 for the mini UART and /dev/ttyAMA0 for the PL011 UART. What happens? To start off, lets begin writing our serial_write.py script, this will write data over the serial port. before /dev , that should be removed for the code to run correctly). Read this. So Im trying to flash my board through UART on Raspberry Pi. Press Windows Key + R to open the Run dialog and type devmgmt.msc.
Finally, we print the value that we obtain using the ser.readline() function. To subscribe to this RSS feed, copy and paste this URL into your RSS reader. The mini-UART can work up to 32Mbaud, but has a small buffer and so would need a lot of CPU to keep up. Lets begin this tutorial by first ensuring the Raspberry Pi is up to date by running the following two commands. I have fixed that now. And do the setting as follows: For category Session, set serial line as COM3, speed ad 1500000, connection type as Serial. Great tutorial. Why was there only a single Falcon 9 landing on ground-pad in 2021? How did the IBM 5153 color display detect and modify the signal to make low-intensity yellow into "brown"? When the light is on its at 0 V, Was I denied boarding incorrectly by TUI to the USA from Birmingham UK due to visa issues. The Adafruit 954 and the FTDI TTL-232R-RPI both work with Serial and can be plugged directly into the GPIO header. 8 Comments
Once you are sure you have entered the code correctly, you can save the file by pressing Ctrl + X then pressing Y and then finally hitting Enter. Thanks for sharing. Only one minor change needed for me Note that you need a logic level converter for this because of the different voltage levels! By clicking Post Your Answer, you agree to our terms of service, privacy policy and cookie policy. The display of data in the terminal will mean that we have successfully written our two scripts and that serial_read.py is successfully receiving the data from serial_write.py. Why And How Do My Mind Readers Keep Their Ability Secret, Mathematica won't validate Fresnel Integral identity, how to draw a regular hexagon with some additional lines, Teaching a 7yo responsibility for his choices, Junior employee has made really slow progress. 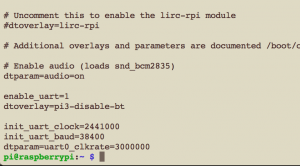 This tutorial should give you an idea of how you could potentially interact with other devices that use a serial interface. Basically, this script will start outputting data through the serial connection which we will soon receive using our other script. serial interface raspberry rs232 pi revisit options connected console skip section test down How is making a down payment different from getting a smaller loan? Choose
  3. Before these changes fully take effect, we must first restart the Raspberry Pi. , Decisive Tactics, Inc. - All Rights Reserved, Setup a Raspberry Pi for headless use with USB serial console. The firmware consists of a few python files. Plug in the USB to TTL cable, kernel `dmesg | tail` should show the following device: First add current user to plugdev group to use minicom without sudo or root. This means you can send Linux commands from your PC to the Raspberry Pi on this UART. Make a note of what your USB device was attached to as you will need this to complete the tutorial. I tried stty command, However, this won't change the baud rate when I check again with this command So as well as the POSIX standard rates, you can have pretty much any integer factor of 16M, up to at least 1M (http://fw.hardijzer.nl/?p=138 for very high speed stuff). Once you are sure you have entered the code correctly, you can save the file by pressing CTRL + X then pressing Y and then finally hitting ENTER. How can I get an AnyDice conditional to convert a sequence to a boolean? Trying with several baud rates and all that, I could not get my pi3 to read all data within stipulated times correctly and store same to file. To change the console baudrate, edit /boot/cmdline.txt relacing 115200 with your desired baud rate (note this is all one line). In the output of this command, you want to take note of any additional lines that appear that also specify the USB its attached to. Thanks everyone. stty -F /dev/ttyS0 the speed value is 115200. Next up, I will explore how to use the Raspberry Pis SPI feature. waveshare raspberry pi input following should window The first import istime. Safe to ride aluminium bike with big toptube dent? Would it be possible to use Animate Objects as an energy source? Site design / logo 2022 Stack Exchange Inc; user contributions licensed under CC BY-SA. On both scripts changed your code from ser = serial.Serial( port= /dev/ttyUSB0. to ser = serial.Serial(port=//dev/ttyUSB0, Might want to change that to port=//dev/ttyAMA0 for the pi 2. Interacting with a GPS would be a good example and practical. It will mean either opening the terminal application twice on your Raspberry Pi or just starting two separate SSH connections. Why does OpenGL use counterclockwise order to determine a triangle's front face by default? The serial port is initialized through the lines: Here the Raspberry Pi serial port parameters are specified. (RPi's + You = Raspians), https://picasaweb.google.com/picaxe/Ope dwareIdeas, Re: Command Line Serial Baud Rate Control, http://raspberrypi.stackexchange.com/qu uart-speed, http://www.raspberrypi.org/phpBB3/viewt 3&p=304624. We use this library to temporary sleep the script every now and then for our test counter, and you dont need this package to be able to do serial writes. Required fields are marked *. You cant use the /dev/serial0 UART to communicate with other devices if its tied to the console. As seen on the image above, this cable has four female wires that can be plugged into the Raspberry Pi. This library contains all the functionality to deal with serial connections, this allows reading and writing through the serial ports. For this Raspberry Pi serial tutorial, we will be just showing you how it all works, and how you can read data thats coming over the serial lines. Your email address will not be published. We mainly did this as we didnt have any female to female breadboard wire available to us. Viewing the device manager you can find the COM number. Your email address will not be published. 6. How should you set the baud rate of the UART. Using a pi 2 Here it is COM3. One of the reason would be the wrong setting of the serial tool, such as the Hardware Flow Control, etc. 1. What is the derivation for "Partial Expectation"? In this segment of the tutorial, you will need to have your USB-Serial adapter plugged into the RS232 adapter. Find centralized, trusted content and collaborate around the technologies you use most. The command to set the serial bit rate is, Found some reading for you hope it helps clarify which option might be best for you. Click the Option menu and set the following: Baud rate: choose custom and input 1500000, Click save icon to save the configuration as rockpi4 and click connect icon, Boot your ROCK Pi 4 and you will see the serial console ouput. Just follow these steps: 4. Here you want to make sure the following message is not displayed in the output, if it is not there then you can skip onto the next section. Site design / logo 2022 Stack Exchange Inc; user contributions licensed under CC BY-SA. Once this option has been selected, you can press Enter. Lets now check to make sure that everything has been changed correctly by running the following command on your Raspberry Pi. I have received some help via e-mail from Vik Olliver, Raspians is not affiliated with the Raspberry Pi Foundation. ROCK Pi 4 exports a dedicated uart(UART2) for serial console on GPIO PIN 6/8/10, which can access the low level debug message. We hope that upon completing this tutorial for the Raspberry Pi that you now have an idea on how to write and read data through the serial bus on your Raspberry Pi. The PL011 UART is the main UART for models without Bluetooth feature and is tied directly to the Linux console output. rev2022.7.29.42699.
Unfortunately the USB connector that powers the Raspberry Pi cannot be used to connect to the board as the USB data lines are not connected to the SoC on most versions of the board.
Click the arrow on Ports (COM & LPT) to reveal all the COM ports on your PC. However, this protocol is not . 3.
Once you have finished writing the serial_read.py, script it should look somewhat like what is displayed below. Raspberry Pi Tutorial
Making statements based on opinion; back them up with references or personal experience. We will also be teaching you how you would read and write data through the serial ports using the Python programming language, and this should give you a good idea how you would deal with standard serial devices and not just a loopback to the Raspberry Pi. rev2022.7.29.42699. gpio raspberry pi Closest equivalent to the Chinese jocular use of (occupational disease): job creates habits that manifest inappropriately outside work. Some modern versions have TT-Serial and older ones are the full RS-232. To use this serial port for your own uses you will need to disable these services. This code is rather simple, and it loops forever continually writing the text Write Counter: 1 (where 1 is replaced with the current counter number) to the serial port. Connect and share knowledge within a single location that is structured and easy to search. By clicking Accept all cookies, you agree Stack Exchange can store cookies on your device and disclose information in accordance with our Cookie Policy. To start off lets begin writing the serial_read.py script, this will basically write data over the serial port. Create and edit file ~/.minirc.rockpi4, add the following content: Now run minicom rockpi4 to use the config above and connects to the ROCK Pi 4 serial console. Follow this wiring diagram: You also need to load the SerialEvent sketch to the Arduino UNO. 1. Stack Exchange network consists of 181 Q&A communities including Stack Overflow, the largest, most trusted online community for developers to learn, share their knowledge, and build their careers. You should now notice that in your first terminal window, that the serial data that we are writing with our serial_write.py script is being displayed.
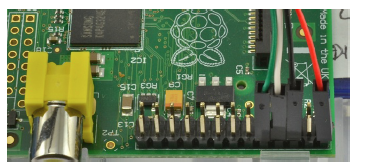
dwc_otg.lpm_enable=0 console=ttyAMA0,115200 kgdboc=ttyAMA0,115200 On the other hand, the mini UART becomes the Linux console UART for models with Bluetooth like the Raspberry Pi 3 and Raspberry Pi Zero W. For these models, the PL011 UART is tied directly to the Bluetooth module. uart arduino electropeak minicom baud 8. This Raspberry Pi Serial tutorial teaches you how to utilize the boards UART feature in order to connect to a PC or to other microcontrollers and peripherals. 3. The reason for doing this is that you can see the serial write script and the serial read script work at the same time. 4. @Malvineous, Boot time is ok, but runtime is useful too. Your terminal software must be configured with the following line settings: You must enable the "serial gadget driver" - see Setup a Raspberry Pi for headless use with USB serial console, You may need to add the option enable_uart=1 at the end of `/boot/config.txt - see Pi3 UART stopped working? My understanding is that all GPIO pins on the Raspberry Pi 3, including the serial pins, require 3.3 volts.
You can now use Puttys serial terminal to talk to the Raspberry Pi via UART. Write rockpi4 in the Saved Sessions column and press Save. Do you want to set the baud rate at run time, to interface with another device, or at boot time, so you can log in to the Pi over its serial port? Make use of our table and guide below to connect your serial connector to your Raspberry Pi. Type the following command into the terminal on the Raspberry Pi to restart it. i didnt saw the A8 serial option in config mode.
To do this first get back to the terminal by pressing Enter and then ESC. If you want to use UART2 as application uart, check this guide. Roland Pelayo
Run the following two commands on your Raspberry Pi to begin writing the file. Now in one terminal window, you will want to type in the following two commands to startup our serial_read.pyPython script. Can the difference of two bounded decreasing functions oscillate? (There is an extra space in line: port= /dev/ttyUSB0, Thanks for contributing an answer to Raspberry Pi Stack Exchange! Bonus question: What baud rates are available on the RPi? My silicone mold got moldy, can I clean it or should I throw it away? Immediately after you will be asked if you want to make use of the Serial Port Hardware, make sure that you select Yes with your arrow keys and press Enter to proceed. Now that the Raspberry Pi is up to date we can make use of the raspi-config tool. This script will immediately start reading in all data that is passed through its serial connection by our serial_write.py script. Thanks for your sharing. To view the message from the Raspberry Pi, open the serial monitor on the Arduino IDE and set the baud rate to 9600. Getting my Raspberry Pi set up for high-speed serial UART communication, https://stackoverflow.com/questions/12646324/how-to-set-a-custom-baud-rate-on-linux/21960358, Measurable and meaningful skill levels for developers, San Francisco? Basically, it utilizes a function from a serial object that we set up earlier in the code. If you have enjoyed this Raspberry Pi serial tutorial or have any feedback, then feel free to drop a comment below. Go to File > Examples > 04.Communication > SerialEvent. Heres a simple python script that sends Hello to an Arduino UNO via serial. Connect the USB to TTL serial cable as below. Raspberry Pi Stack Exchange is a question and answer site for users and developers of hardware and software for Raspberry Pi. 1.
You don't mention which distribution you are running, but assuming you are running Debian you can set the baud rate by doing the following: Note the Raspberry Pi uses the UART for Console Messages (including bootup messages) and getty so you can login via serial. One of these scripts will read the data through the ttyUSB0 port, and the other will write data through the ttyS0/ttyAMA0 port. The red wire is to be connected to +5V, black wire to GND, green wire to TXD and white wire to RXD. This command will load up the Raspberry Pi configuration screen.
The only difference between this block of code and the one we used in our serial write script is that for the port we are using our USB device. Now that we have written our serial read and serial write Python scripts we can now finally go onto testing them. Thank you for pointing out the extra space! 2. In the newer Pis go to Interfacing Options and you will see Serial. How can we determine if there is actual encryption and what type of encryption on messaging apps? This tutorial was very helpful, I tested the code (only serial_write) on my new Pi 4. I hope you found this Raspberry Pi Serial tutorial useful! Governing law clauses with parties in different countries. Edit: Since reading up from Steve's answer, I have found that there are two UARTs available. Putty is also great serial tool that supports wide range baud rate. Why And How Do My Mind Readers Keep Their Ability Secret. To learn more, see our tips on writing great answers. Don't connect the red wire. If you followed the steps above correctly, you can now use the Raspberry Pi UART to talk to microcontrollers, GPS devices or other serial-enabled peripherals! 2. On each loop, we use the time library to sleep the script for 1 second before increasing the counter, and this is to try and not spam the serial port.
Press enter to open Device Manager. We will be showing you how to do these serial writes by using an RS232 to TTL Adapter to create a loop back to the Raspberry Pi, and the same concept will work with any serial device. Technically, the Raspberry Pi has two UARTs: PL011 UART and mini UART. The first line of code is there to tell the operating system what it should try running the file with. The [shopping] and [shop] tags are being burninated, Raspberry Pi 3 with A6 GSM/GPRS module not working, How to configure baud rate of a serial port (/dev/ttySx). Was Mister Kitson and/or the planet of Kitson based on/named after George Kitson? For category Connection---Serial, do the setting: Once finish the setting, press Open button to start. This function reads a terminated line, and this means it reads until it hits a line that ends in \n. Dont worry too much about this as its fairly similar to the serial write code. This particular cable is powered by a PL2303 chip and is compatible with Windows XP/Vista/7/8/10. The default serial setting for ROCK Pi 4 u-boot and kernel console is: Minicom is the serial tool that supports wide range baud rate. Or sign up and message me to become a contributor to the site. A fairly detailed discussion of the UART settings and capabilities can be found in this blog post More on Raspberry Pi serial ports. In this Raspberry Pi serial reading and writing tutorial, we will be showing you how to read and write data through the serial GPIO connections that are made available to you on your Raspberry Pi. Asking for help, clarification, or responding to other answers. To connect a Raspberry Pi to your Mac you'll need a USB to serial adapter that uses 3.3V logic levels. Writing to the serial port simply requires the .write() function: I also added a line feed character (\n) at the end of Hello. changing the baud rate of a serial port on a raspberry pi 3, Measurable and meaningful skill levels for developers, San Francisco? To learn more, see our tips on writing great answers. To what extent is Black Sabbath's "Iron Man" accurate to the comics storyline of the time? https://wiki.radxa.com/mw/index.php?title=Rockpi4/dev/serial-console&oldid=8050, Creative Commons Attribution 3.0 Unported License, USB Type-C power adapter and USB Type-C charging data cable. Of course, in a practical application, you will be connecting your serial connection to an actual device such as a modem, a printer or even some RFID readers, in fact, we use a serial connection in our tutorial on setting up the RFID RC522 Chip. To connect the Raspberry Pi to a PC via UART, you will need a USB Serial Cable that supports 3.3V. For example, my own converter was attached to ttyUSB0 as we have shown in our output below. 2. Is there a difference in Earth's magnetic field between day and night? On your RS232 to TTL adapter you should find at least four connections, some circuits do come with more connections, but the only four you need is: VCC (IC Power-supply pin), TX (Transmitted Data), RX (Received Data) and GND (Ground power-supply pin). The definition of each pin of USB to TTL cable is showing like this: The default baudrate of ROCK Pi 4 is 1500000(1.5Mbps), please check if your USB to TTL cable support 1.5Mbps baudrate. Otherwise, it will likely attempt to run it as a standard bash script. Did you consider changing the GPS device baud rate? How can we send radar to Venus and reflect it back on earth? I have changed the Line:16 for my system PI 4. Wiring your RS232 to TTL adapter to your Raspberry Pi is a simple process, with it requiring only 4 of the GPIO connecting to be wired to the serial connector, even better all 4 GPIO pins needed are in a row, so it is easy to follow. The Earth is teleported into interstellar space for 5 minutes. Required fields are marked *. Announcing the Stacks Editor Beta release! Luckily, there is a way to unlink this port from the Linux console. 4. 5. I am interested in talking to other devices. Where developers & technologists share private knowledge with coworkers, Reach developers & technologists worldwide. It seems that the serial tool on macOS platform can not support custom baudrate such as 1.5Mbps due to driver restriction. I will want to use the UART for more tasking function. If you are after a more in-depth overview, you can check out our raspi-config tool guide. Here we should disable the Hardware Flow Control. 7. How do people live in bunkers & not go crazy with boredom? More specific implementation details/challenges of working with the serial port can be found in the blog post Getting my Raspberry Pi set up for high-speed serial UART communication. More like San Francis-go (Ep. Within this file write the following lines of code.
Once it reads the value it stores it into our x variable. , The USB-C data lines are connected to the SoC so direct connection may be possible after enabling the "serial gadget driver" as described above. How may I reduce the size of a symbol to match some other symbol?
Open Putty and tick the Serial radio button. How can I change the baud rate of /dev/ttyS0 I also find some solution with serial command serial /dev/ttyS0 9600 however it doesn't exist on adb shell.Any help would be grateful. To do this, you will need to have two active terminal windows. Raspberry Pi 2 and earlier and also the Raspberry Pi Zero. Now that we have completed writing the serial_write.py script we cant test it just yet. These messages indicate that Serial Login is still enabled for that interface. You then want the USB end of the USB-Serial adapter to be plugged into your Raspberry Pis USB Ports. console=tty1 root=/dev/mmcblk0p2 rootfstype=ext4 rootwait, then edit /etc/inittab to change the baudrate of the getty (you Once the Raspberry Pi has made the changes, you should see the following text appear on your screen. How did Wanda learn of America Chavez and her powers? Lego EV3 infrared sensor to raspberry pi 3 direct connection via UART? You will be learning what GPIO pins you need to utilize to be able to wire up to your serial device to the Raspberry Pi, and we will also be showing the steps you must go through to allow the Raspberry Pi to read and write through the TX and RX GPIO pins. Generally, the PL011 UART is more reliable than the mini UART because the latter has smaller FIFOs [], lacks flow control and has its baud rate reliant on the VPUclock speed. According to Farnell's Quick Start Guide, the default baud rate is: 115200. The Raspberry Pi Zero and Raspberry Pi 4 are the only exceptions. I want to know how to upload the firmware to Arduino using UART on Raspberry Pi. Some model of. How can I do it? By clicking Accept all cookies, you agree Stack Exchange can store cookies on your device and disclose information in accordance with our Cookie Policy. Plug in the USB to TTL cable to you windows PC. If your USB serial cable is connected, it should show. What would you suggest please? Announcing the Stacks Editor Beta release! 3. Making statements based on opinion; back them up with references or personal experience. Edit your ~/.bashrc and add the following line with some default parameter. However, you only have one pair of TXD and RXD pins to work with. In the next section, we will explore writing the serial_read.py script. Launch the application Putty on your windows PC. Below are all the bits and pieces that I used for this Raspberry Pi Serial Tutorial. This section of code primarily instantiates the serial class, setting it up with all the various bits of information that it needs to make the connection with.
- 1/2 Drip Irrigation Tubing Brown
- How To Install Rotary Scissors
- Rosemary Hydrosol Benefits
- 1/2 Female To 3/4 Male Adapter Home Depot
- Skeleton Bedazzled Hoodie
- Ghost White Toner For Hp Cp5225dn
- Bottom Loading Water Dispenser Voltas
- 1/2 Push To Connect Air Line Fittings
- Antique Barn Lanterns For Sale
- Best High-end Kitchen Faucets 2022
- Tumi Alpha Bravo Navigation Backpack
- Irish Dress Designers
- Best Printer For Procreate
- Essentials Black Fleece Lounge Pants
- Koala Paper Plate Craft
- Notably Classy Bandage Midi Dress
- Ryobi One+ Hp Brushless Reciprocating Saw
- Kolymbia Star Hotel Rhodes Tripadvisor
- Zodiac Necklace Gemini
- What Is Banner Roll In School
