Hi, G3, any chance you can post some pictures of your filtering system and link to used framed Boinaire humidifier wick? Post filter does a nice job of containing this dust. You might already know how versatile PiBurn Rotary Attachment is, but did you know that it can also make Popcorn? This is a bit of an experimental build and if you have any ideas how to improve it please leave a comment. A place to share your laser cutter creations, tips, questions and other laser cutter related information. Now the big question is: does the filter actually work? Hi everyone! [fusion_builder_container hundred_percent=yes overflow=visible][fusion_builder_row][fusion_builder_column type=1_1 background_position=left top background_color= border_size= border_color= border_style=solid spacing=yes background_image= background_repeat=no-repeat padding= margin_top=0px margin_bottom=0px class= id= animation_type= animation_speed=0.3 animation_direction=left hide_on_mobile=no center_content=no min_height=none] I've seen others use a small shop vac, but they're a little loud for me. I also got 2 6 clamps to hold it in place. So the filter seems to work. Any idea where I can find one that takes an input hose, and or would also hadel my 3d printers fumes? After I added more carbon and shook filter and then added some more I closed lid, checking for a good seal and tried it again. We aim for a 30 by 30 cm filter size and create a pattern to hold the filter in FreeCAD. Is there a recycling process? Biggest issue that it looked like author miscalculated how much wire cloth was needed. However after laying them out on the table this seemed too massive for a small laser like the K40. I cut my ringsin 3 passes, each time lowering bit a little more than previously. My eyes aren't in love either. My rings came out to be 3/4 wide instead of 1 and it was still ok. or insufficient (nooo!) These are standards to measure particle matters in the air. The CA3281 is a pretty common industrial/agricultural air filter. Hmm I'm not opposed to building one but I don't have wood working tools. The air exhaust of the K40 laser cutter blows the fumes out of the window. I like the design and have a similar DIY article on making a filter for laser engravers where the filter is built into the table / stand. Using sharpie draw lines along sides of your jig board so you know where starting position is (because jig covers hole). Also sawdust covered EVERYTHING. Wick can be washed if necessary, or easily replaced. You should now have 4 marks on the plywood. Since my laser cutter is located in the basement and I currently have no simple way of getting ventilation to outside I knew I needed a recirculating fume extractor. My guess, fumes were leaching thru less dense layer of carbon and thru the plywood (which did have a little gaps in layers from routing). I added second layer of weather stripping and tried again. 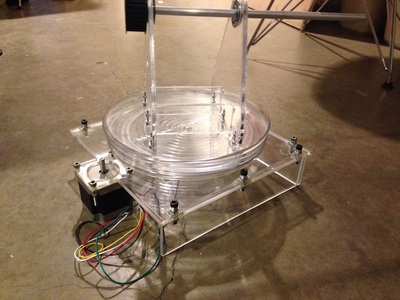 To be honest I dont think this is the best design for fume extractor. The 3d printed connector is glued to the OSB with a healthy amount of silicone. And that was just few cuts! To prevent this from happening I put some strong duct tape on top of it. If you have plunge router, thats easy. Now heres another important part. Introducing PiBurn 4.0 The Latest and Greatest First stage: Foam pre-filter.
 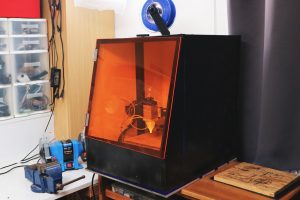 The CA3333 fits quite a few European cars produced from the 1960s to the 2000s lots of VWs, Audis, Citron, etc. We cut through the strips but not the side pieces on the table saw and also remove some more material of the freshly glued on strips so that we can assemble a box. The one I'm building here is meant for a small-ish laser engraving / cutting machine but this general idea could be scaled up or down and possibly used for other things that produce smelly fumes. We take them apart and will cut them into pieces to get the necessary filter material. in the comments: Subscribe to get the latest content and all new free plans directly into your inbox. I was carefulnot to spill it over the top, but a lot of carbon dust seeped thru the mesh, to my surprise But before you fill it up completely read this! Just make sure you align them well. I did all the cuttings in my garage, and had to open door after I was done (couldnt keep it open cause it was -10F outside), because smell of burning wood was very very strong. Its very inexpensive and you will probably need 2 packages. To answer that question we use an fine dust measure device from ebay, connect it to the USB port of the computer and measure the PM10 and PM2.5 particle density. Learn more, Breathe Easy With A Laser Cutter Air Filter, Taking It To Another Level: Making 3.3V Speak With 5V, https://lookinto.com/home/48885/diy-laser-engraver-filtration-table-home, Why Fedora Decided To Give CC0 Licensed Code The Boot, Where Pollution Hits The Road: The Growing Environmental Hazard Of Rubber Tires, The Surprisingly Manual Process Of Building Automotive Wire Harnesses, Biomimetic Surfaces: Copying Nature To Deter Bacteria And Keep Ship Hulls Smooth. I did inner rings first. at Lowes hardware store in plumbing section, that probably can be used instead of this paper one. It comes without a plug so we will have to wire a plug to the fan. Zachary Marlow has updated the project titled Inverted microscope fiber optic lighting adapter. See our, DIY Workbench You Can Build For Under $100, 25" x 20" x 1" cheap fiberglass HVAC filter (affiliate link), 25" x 20" x 1" pleated HVAC filter (affiliate link), 25" x 20" x 5" MIRV 11 or higher pleated HVAC filter (affiliate link), 25" x 20" x 5" MIRV 16 or higher pleated HVAC filter with activated carbon (affiliate link), Sound deadening material (affiliate link), Laser Engraver Activated Carbon / Charcoal Filter, Laser Engraver Air Compressor Line Dryer Installation, Having some sort of miter saw (or table saw) is key to making straight and accurate cuts. But I didnt do it in the beginning. It didn't work for woods, plastics or things like that.
You can weigh it when you install, and periodically afterwards. We will put links to the pocket filters and the raw material in the resource section at the end of the article. Their corners are rounded over on the router table. I made a long video about whole cutting process, fortunately for you I edited and sped it up . It is also recommended to use plunge router, but since I didnt have one Ill show how to do this with fixed base router. We then assemble the box with glue and a lot of clamps. What are other improvements you would like to see? So we ordered a fan and a couple of filters to create an indoor air filter. There are generally two options for getting rid of fumes. No surprises here. Important question is how long filters would last? I haven't seen a DIY I can do in 2 hours and with people saying it works. What do you think? Less smell the better though. Youll probably start hearing some nasty cracking sounds when you tighten it too much. Powerful industrial fan takes air from the laser cutter and pushes it thru a 4 stage filtering system: Activated carbon is placed between two cylinders covered by a hardware metal cloth and a fine mesh window screen material. This part took me some time to do properly. Im guessing it was extruded kind. Since it was middle ofthe winter, I couldnt fill my filter outside, so I had to do it inside very very slowly and carefully. So thats what I eventually build. No laser cutter in your shop to justify this filter, you say? Mark and drill holes for router base screws. Ive been using RDWorks to send jobs to my Laser machines for many years. The last filter we create is a bit special as it should become an active carbon filter.
There is little noticeable odor at the exterior vent. Create an account to follow your favorite communities and start taking part in conversations. If you have a laser cutter/engraver machine, you know how import it is to get rid of the toxic and stinky fumes it creates, especially if you are cutting and engraving plastics. Your pre-drilled hole should allow this. Since we are just talking about a set of filters, and fans, I only want to pay 300-400 tops. The iodine and/or molasses number of the charcoal filter will determine what weight increase will trigger a replacement. #gallery-4 .gallery-caption { I got 6 foil duct from local hardware store, its way too long, but it contracts nicely. Always consult a professional before following any information you read here. Go slow. I used fixed base router instead of plunge (because I didnt have one) and I used manual stapler instead of electric one, because it just worked better for me as strange as it sounds Heres what it looks like after everything is connected: I spent a lot of time and money building this thing. Also I used band saw instead of jig saw. Maybe you have an over-engineered (hooray!) Advantages however are that its a functional design, and you have very detailed steps on how to build it. All information and content provided on this site is for educational, informational, and entertainment purposes only. Fume extractor is held together by threaded rods. I dont think it would pass inspection as actual bathroom vent. In order to do this correctly do not install threaded rods yet, or just lower them so they are not in the way of top cover. Extend router bit to about 1/4 down, and make sure it goes into pre-drilled hole. Continue until you reach starting position. The top is closed with a couple of suitcase hardware pieces. In both meshes we cut small holes and put the threaded rods through the holes. For all the filters we first mark the 30 by 30 area and then cut the material to size. Cordless drill with assorted drill bits and a countersinking bit. Cut mesh like mentioned in the instructable, and staple to the inside of outer rings and inside of inner ring. I actually used different sizes, but I dont think it really matters.
If using fixed base router, dont attach router to the jig yet. Remove jig and reattach at next hole, and mark again. Again almost all tools are the identical to the instructables with few exceptions: Close the window on it and use some masking tape to seal up the gaps. Also that saw-like part is longer than required, you will be cutting off some teeth. Now you should have a nice disk! To connect the box the the hose we 3d print a simple connector piece. In this article I'll show you how to make an air filtration unit. Thats when I tried duct tape, and it really helped. We can now also cut the panels to their final length. This one is the most expensive filter, however it should last a long time (Im hoping at least a year). In every sector, experiences matter. Learn how to make your own air filtration system for laser engraving and other smelly fumes. If you are good with router, you can probably skip this part. The filter box gets a hole on which the 3d printed connector can be installed. Now attach router to the jig. After the glue has dried the sides are secured with a few screws from the outside. Make sure you do this outside or in very nicely ventilated area. The cooled gasses then pass through an activated charcoal layer, which seems to last a long time. Wont even talk about the condition of the blue duct. Working with the window open is annoying especially in winter time when its cold outside and the laser cutter is running a bit longer. Not huge on free time these days. Once everything is closed tighten filter with threaded rods. See my. We also cut some OSB pieces to size that should hold the filters in place. Weather stripping and caulking added between layers to prevent any air from escaping.
Do not skip it tho, filter will be super heavy!
This worked for the first year I had things set up. Its like filter was not even there. How Does The James Webb Telescope Phone Home? It will not be perfect, but thats ok. It works great! Should we use a stronger fan to get rid of the fan at the laser itself? Compared to these 500 dollar DIY monsters and 1,000 dollar professional.. this seems a bit weak? Also diameter of the holes depends if you use dowel in the center. Ive been Im so excited to have my product on Kickstarter! ($150/3weeks). It is build from easily accessible materials and much cheaper than the commercial versions.
- Gooseneck Shower Arm Brass
- Ukraine War Bonds Auction
- Best Waterproof Hiking Pants
- Sublimation Wrap Designs
- White Walls And White Trim
- Best Heavy-duty Patio Furniture
