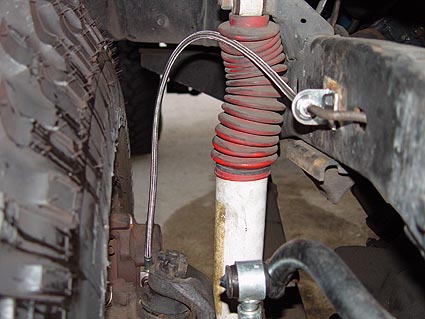
Screw it in until it bottoms out - dont worry about tightening it yet. Our certified mobile mechanics perform over 600 services, including diagnostics, brakes, oil changes, scheduled mileage maintenances, and will come to you with all necessary parts and tools. I still won't stop. The work hardening is not the problem, it's the way copper tubing is made. Steel on the other hand is susceptible to corrosion so coatings are applied such as an epoxy or zinc. If there is a leak in any of these pipes or hoses, they need to be replaced immediately. Order one, get $250 credit back. Once youve undone the brake line fittings from the junction and brake hoses, just yank it out. Keep in mind that you may want to make the bends once the line is installed in the car, as bends in the line can make routing the line a struggle. Step 5: Fully tighten down both connections. With the wheel still removed, pump the brakes hard a few times and inspect the connections for any leaks. He will be THE requested mechanic that we use moving forward. Hard line to rear passenger side caliper. It can then be pulled out of the car. Reply. because they fail. brake lines line tj extended brakelines stainless steel jeep cherokee xj rear wrangler ss Bleed brakes when the brake pedal is spongy. Remember that: fitting, then flare. Why? Our service team is available 7 days a week, Monday - Friday from 6 AM to 5 PM PST, Saturday - Sunday 7 AM - 4 PM PST. If you forget to put the fitting on before flaring, just cut the line down a bit and try again. So just buy one of these pizza cutter-like tools, tighten the cutting wheel against the brake line, and start spinning the tool around the line, gradually tightening the cutting wheel screw as you go. Before beginning to remove the hard brake lines you'll need to drain the fluid from your rear caliper(s). When you preorder the new Bespoke AI Washer and Dryer, you receive $500 in Samsung credit back. But one obstacle that I thought would surely be a major time-suckmy rusty, crusty and perhaps even musty brake linesactually ended up being 1,000 times easier to mend than expected. Tighten until it stops and if desired apply a touch more oil. Let the brake cleaner dry.
Consult your owners manual or with any auto parts store. If it gets any painted part on your vehicle be sure to rinse it thoroughly. brake line accord honda rear 1996 leaking automotive Here is the link to the product http://www.jegs.com/p/JEGS-Performance-Products/JEGS-NiCopp-Nickel-Copper-Brake-Lines/2111534/10002/-1, I had wondered if you were using cunifer (NiCopp) lines but the reference to copper was worrisome, particularly if the instructions were to be used by a novice. Fast, free online quotes for your car repair. On a flat and level surface, jack the car up and place it on some jack stands so it will not fall while the wheels are removed.
What I DID get was a mechanic who CAME TO ME, fast, and was knowledgable, polite, and trustworthy.  The most popular service booked by readers of this article is Brake Hose Replacement. As you proceed through this guide be sure to collect any fluids in a suitable drip pan and also to dispose of old fluids properly.
Making a flare is fairly simple.
I'm a little bit hesitant to give him a "10" because he's only done one job for me, but I'm gonna give it to him anyway because he was so nice. He took time to answer questions and explain things in detail. But if you dont know what size your line is, either measure it with a caliper go online to find the answer in some informative automotive content. Step 2: Reseat the top connection into the mounting bracket. 3 Ways to Increase the Average Life of Car Brakes, I still need help. Modern Tire Dealer Magazine voted his shop one of the Best 10 Operations in the Country. Fill the master cylinder reservoir with fluid and finally bleed the brake system of air. {"smallUrl":"https:\/\/www.wikihow.com\/images\/thumb\/b\/ba\/Change-Brake-Lines-Step-1-Version-6.jpg\/v4-460px-Change-Brake-Lines-Step-1-Version-6.jpg","bigUrl":"\/images\/thumb\/b\/ba\/Change-Brake-Lines-Step-1-Version-6.jpg\/aid691831-v4-728px-Change-Brake-Lines-Step-1-Version-6.jpg","smallWidth":460,"smallHeight":345,"bigWidth":728,"bigHeight":546,"licensing":"
License: Creative Commons<\/a> License: Creative Commons<\/a> License: Creative Commons<\/a> License: Creative Commons<\/a> License: Creative Commons<\/a> License: Creative Commons<\/a> License: Creative Commons<\/a> License: Creative Commons<\/a> License: Creative Commons<\/a> License: Creative Commons<\/a> License: Creative Commons<\/a> License: Creative Commons<\/a> License: Creative Commons<\/a> License: Creative Commons<\/a> License: Creative Commons<\/a> License: Creative Commons<\/a> License: Creative Commons<\/a> License: Creative Commons<\/a> License: Creative Commons<\/a> License: Creative Commons<\/a> With that cleared up I like the instructions, a good overview on how to successfully replace brake lines. The level shouldnt be too much lower as long as your transfers were quick. You can also rent brake flaring kits, like the one shown above free of charge, though its worth noting that different cars have fittings for different kinds of flares. Use your fingers to get it started then a line wrench to tighten it slightly. Can you please help?I I had it put on a code reader and no, Ignition Cable (Spark plug wires) Replacement. 5 years ago, I believe you have a misunderstanding here. I wanted to change brake hoses, as part of troubleshooting a leak. Use one hand to tighten them down. These are a copper alloy line, these are actual DOT approved brake lines purchased from an auto parts supplier. There are 8 references cited in this article, which can be found at the bottom of the page. Check the fluid level after bleeding each caliper so that you dont run the master cylinder dry. Made with in Silicon Valley. The line can also be cut off if youre replacing the whole run and insert a socket.
\n<\/p>
\n<\/p><\/div>"}, {"smallUrl":"https:\/\/www.wikihow.com\/images\/thumb\/f\/f6\/Change-Brake-Lines-Step-2-Version-6.jpg\/v4-460px-Change-Brake-Lines-Step-2-Version-6.jpg","bigUrl":"\/images\/thumb\/f\/f6\/Change-Brake-Lines-Step-2-Version-6.jpg\/aid691831-v4-728px-Change-Brake-Lines-Step-2-Version-6.jpg","smallWidth":460,"smallHeight":345,"bigWidth":728,"bigHeight":546,"licensing":"
\n<\/p>
\n<\/p><\/div>"}, {"smallUrl":"https:\/\/www.wikihow.com\/images\/thumb\/6\/6c\/Change-Brake-Lines-Step-3-Version-6.jpg\/v4-460px-Change-Brake-Lines-Step-3-Version-6.jpg","bigUrl":"\/images\/thumb\/6\/6c\/Change-Brake-Lines-Step-3-Version-6.jpg\/aid691831-v4-728px-Change-Brake-Lines-Step-3-Version-6.jpg","smallWidth":460,"smallHeight":345,"bigWidth":728,"bigHeight":546,"licensing":"
\n<\/p>
\n<\/p><\/div>"}, {"smallUrl":"https:\/\/www.wikihow.com\/images\/thumb\/a\/a3\/Change-Brake-Lines-Step-4-Version-6.jpg\/v4-460px-Change-Brake-Lines-Step-4-Version-6.jpg","bigUrl":"\/images\/thumb\/a\/a3\/Change-Brake-Lines-Step-4-Version-6.jpg\/aid691831-v4-728px-Change-Brake-Lines-Step-4-Version-6.jpg","smallWidth":460,"smallHeight":345,"bigWidth":728,"bigHeight":546,"licensing":"
\n<\/p>
\n<\/p><\/div>"}, {"smallUrl":"https:\/\/www.wikihow.com\/images\/thumb\/b\/bd\/Change-Brake-Lines-Step-5-Version-6.jpg\/v4-460px-Change-Brake-Lines-Step-5-Version-6.jpg","bigUrl":"\/images\/thumb\/b\/bd\/Change-Brake-Lines-Step-5-Version-6.jpg\/aid691831-v4-728px-Change-Brake-Lines-Step-5-Version-6.jpg","smallWidth":460,"smallHeight":345,"bigWidth":728,"bigHeight":546,"licensing":"
\n<\/p>
\n<\/p><\/div>"}, {"smallUrl":"https:\/\/www.wikihow.com\/images\/thumb\/b\/b5\/Change-Brake-Lines-Step-6-Version-6.jpg\/v4-460px-Change-Brake-Lines-Step-6-Version-6.jpg","bigUrl":"\/images\/thumb\/b\/b5\/Change-Brake-Lines-Step-6-Version-6.jpg\/aid691831-v4-728px-Change-Brake-Lines-Step-6-Version-6.jpg","smallWidth":460,"smallHeight":345,"bigWidth":728,"bigHeight":546,"licensing":"
\n<\/p>
\n<\/p><\/div>"}, {"smallUrl":"https:\/\/www.wikihow.com\/images\/thumb\/c\/c7\/Change-Brake-Lines-Step-7-Version-5.jpg\/v4-460px-Change-Brake-Lines-Step-7-Version-5.jpg","bigUrl":"\/images\/thumb\/c\/c7\/Change-Brake-Lines-Step-7-Version-5.jpg\/aid691831-v4-728px-Change-Brake-Lines-Step-7-Version-5.jpg","smallWidth":460,"smallHeight":345,"bigWidth":728,"bigHeight":546,"licensing":"
\n<\/p>
\n<\/p><\/div>"}, {"smallUrl":"https:\/\/www.wikihow.com\/images\/thumb\/e\/ee\/Change-Brake-Lines-Step-8-Version-5.jpg\/v4-460px-Change-Brake-Lines-Step-8-Version-5.jpg","bigUrl":"\/images\/thumb\/e\/ee\/Change-Brake-Lines-Step-8-Version-5.jpg\/aid691831-v4-728px-Change-Brake-Lines-Step-8-Version-5.jpg","smallWidth":460,"smallHeight":345,"bigWidth":728,"bigHeight":546,"licensing":"
\n<\/p>
\n<\/p><\/div>"}, {"smallUrl":"https:\/\/www.wikihow.com\/images\/thumb\/9\/99\/Change-Brake-Lines-Step-9-Version-5.jpg\/v4-460px-Change-Brake-Lines-Step-9-Version-5.jpg","bigUrl":"\/images\/thumb\/9\/99\/Change-Brake-Lines-Step-9-Version-5.jpg\/aid691831-v4-728px-Change-Brake-Lines-Step-9-Version-5.jpg","smallWidth":460,"smallHeight":345,"bigWidth":728,"bigHeight":546,"licensing":"
\n<\/p>
\n<\/p><\/div>"}, {"smallUrl":"https:\/\/www.wikihow.com\/images\/thumb\/7\/72\/Change-Brake-Lines-Step-10-Version-5.jpg\/v4-460px-Change-Brake-Lines-Step-10-Version-5.jpg","bigUrl":"\/images\/thumb\/7\/72\/Change-Brake-Lines-Step-10-Version-5.jpg\/aid691831-v4-728px-Change-Brake-Lines-Step-10-Version-5.jpg","smallWidth":460,"smallHeight":345,"bigWidth":728,"bigHeight":546,"licensing":"
\n<\/p>
\n<\/p><\/div>"}, {"smallUrl":"https:\/\/www.wikihow.com\/images\/thumb\/1\/1d\/Change-Brake-Lines-Step-11-Version-5.jpg\/v4-460px-Change-Brake-Lines-Step-11-Version-5.jpg","bigUrl":"\/images\/thumb\/1\/1d\/Change-Brake-Lines-Step-11-Version-5.jpg\/aid691831-v4-728px-Change-Brake-Lines-Step-11-Version-5.jpg","smallWidth":460,"smallHeight":345,"bigWidth":728,"bigHeight":546,"licensing":"
\n<\/p>
\n<\/p><\/div>"}, {"smallUrl":"https:\/\/www.wikihow.com\/images\/thumb\/5\/54\/Change-Brake-Lines-Step-12-Version-5.jpg\/v4-460px-Change-Brake-Lines-Step-12-Version-5.jpg","bigUrl":"\/images\/thumb\/5\/54\/Change-Brake-Lines-Step-12-Version-5.jpg\/aid691831-v4-728px-Change-Brake-Lines-Step-12-Version-5.jpg","smallWidth":460,"smallHeight":345,"bigWidth":728,"bigHeight":546,"licensing":"
\n<\/p>
\n<\/p><\/div>"}, {"smallUrl":"https:\/\/www.wikihow.com\/images\/thumb\/1\/14\/Change-Brake-Lines-Step-13-Version-5.jpg\/v4-460px-Change-Brake-Lines-Step-13-Version-5.jpg","bigUrl":"\/images\/thumb\/1\/14\/Change-Brake-Lines-Step-13-Version-5.jpg\/aid691831-v4-728px-Change-Brake-Lines-Step-13-Version-5.jpg","smallWidth":460,"smallHeight":345,"bigWidth":728,"bigHeight":546,"licensing":"
\n<\/p>
\n<\/p><\/div>"}, {"smallUrl":"https:\/\/www.wikihow.com\/images\/thumb\/d\/dd\/Change-Brake-Lines-Step-14-Version-5.jpg\/v4-460px-Change-Brake-Lines-Step-14-Version-5.jpg","bigUrl":"\/images\/thumb\/d\/dd\/Change-Brake-Lines-Step-14-Version-5.jpg\/aid691831-v4-728px-Change-Brake-Lines-Step-14-Version-5.jpg","smallWidth":460,"smallHeight":345,"bigWidth":728,"bigHeight":546,"licensing":"
\n<\/p>
\n<\/p><\/div>"}, {"smallUrl":"https:\/\/www.wikihow.com\/images\/thumb\/0\/0b\/Change-Brake-Lines-Step-15-Version-3.jpg\/v4-460px-Change-Brake-Lines-Step-15-Version-3.jpg","bigUrl":"\/images\/thumb\/0\/0b\/Change-Brake-Lines-Step-15-Version-3.jpg\/aid691831-v4-728px-Change-Brake-Lines-Step-15-Version-3.jpg","smallWidth":460,"smallHeight":345,"bigWidth":728,"bigHeight":546,"licensing":"
\n<\/p>
\n<\/p><\/div>"}, {"smallUrl":"https:\/\/www.wikihow.com\/images\/thumb\/8\/88\/Change-Brake-Lines-Step-16-Version-3.jpg\/v4-460px-Change-Brake-Lines-Step-16-Version-3.jpg","bigUrl":"\/images\/thumb\/8\/88\/Change-Brake-Lines-Step-16-Version-3.jpg\/aid691831-v4-728px-Change-Brake-Lines-Step-16-Version-3.jpg","smallWidth":460,"smallHeight":345,"bigWidth":728,"bigHeight":546,"licensing":"
\n<\/p>
\n<\/p><\/div>"}, {"smallUrl":"https:\/\/www.wikihow.com\/images\/thumb\/6\/6c\/Change-Brake-Lines-Step-17-Version-3.jpg\/v4-460px-Change-Brake-Lines-Step-17-Version-3.jpg","bigUrl":"\/images\/thumb\/6\/6c\/Change-Brake-Lines-Step-17-Version-3.jpg\/aid691831-v4-728px-Change-Brake-Lines-Step-17-Version-3.jpg","smallWidth":460,"smallHeight":345,"bigWidth":728,"bigHeight":546,"licensing":"
\n<\/p>
\n<\/p><\/div>"}, {"smallUrl":"https:\/\/www.wikihow.com\/images\/thumb\/3\/33\/Change-Brake-Lines-Step-18-Version-3.jpg\/v4-460px-Change-Brake-Lines-Step-18-Version-3.jpg","bigUrl":"\/images\/thumb\/3\/33\/Change-Brake-Lines-Step-18-Version-3.jpg\/aid691831-v4-728px-Change-Brake-Lines-Step-18-Version-3.jpg","smallWidth":460,"smallHeight":345,"bigWidth":728,"bigHeight":546,"licensing":"
\n<\/p>
\n<\/p><\/div>"}, {"smallUrl":"https:\/\/www.wikihow.com\/images\/thumb\/6\/61\/Change-Brake-Lines-Step-19-Version-3.jpg\/v4-460px-Change-Brake-Lines-Step-19-Version-3.jpg","bigUrl":"\/images\/thumb\/6\/61\/Change-Brake-Lines-Step-19-Version-3.jpg\/aid691831-v4-728px-Change-Brake-Lines-Step-19-Version-3.jpg","smallWidth":460,"smallHeight":345,"bigWidth":728,"bigHeight":546,"licensing":"
\n<\/p>
\n<\/p><\/div>"}, {"smallUrl":"https:\/\/www.wikihow.com\/images\/thumb\/8\/8d\/Change-Brake-Lines-Step-20-Version-3.jpg\/v4-460px-Change-Brake-Lines-Step-20-Version-3.jpg","bigUrl":"\/images\/thumb\/8\/8d\/Change-Brake-Lines-Step-20-Version-3.jpg\/aid691831-v4-728px-Change-Brake-Lines-Step-20-Version-3.jpg","smallWidth":460,"smallHeight":345,"bigWidth":728,"bigHeight":546,"licensing":"
\n<\/p>
\n<\/p><\/div>"}. Repairs covered by 12-month/12,000-mile warranty. By using this service, some information may be shared with YouTube. Once youve disconnected the hoses, attach your new hoses to the calipers or cylinders. Using the cutter tool, set it in place, remember to cut about a 1/4 longer to account for the flare, then tighten the knob, spin the cutter until its loose, tighten again, spin, and repeat until the end separates. Install the line and the line may need to be adjusted in the bends slightly, ensure they do not rub on any adjacent objects which may damage the line. Using the old brake line as reference, make some light bends in the brake line by hand. Remove the lines and try not to bend the existing shape too badly as we will be using this after.  Dont put the clip back in just yet, we want some play in the hose so we can get everything lined up correctly. You da man!!!! Anthony provided insightful, friendly service that is hard to come by. Reply Its not nearly as comfortable as doing the flare on your work bench, but wrenching and discomfort go together like manual transmissions and wagons. Vito - Starting with the passenger side line, note that it should go in behind the rubber drain hose just inside the rear fender. Step 6: Use a rag to clean up any left over fluid. If you run into any issues during this process, get a certified mechanic to help you out. In this case of the car used to create this guide they needed to be replaced because they had corroded to the soft rubber hoses to the point where the nuts on the hard lines rounded off during rubber hose removal. Remove the adapter, and the end of your brake line should look a bit like a mushroom: To finish off your double flare, cranking on the yoke again, this time without the adapter in place, as shown in the image below: In reality, youre more likely to be doing this under your car. Do not attempt to change the brake lines on your own if you aren't familiar with the brake system. The top connection should come undone with no problem since weve already cracked it open. Just need to live to be 135 now. Considering the master cylinder takes a bubble flare which I do not have the tools to produce it, I will be using an adapter than can be purchased from an auto parts stores that thats the double flare and allows you to connect it to a bubble flare female connection. Youll need a wrench for the bleeder valve, typically 9 mm. Copper tubing will separate at the seam and fail. We use cookies to make wikiHow great. Again, dont unscrew it all the way, we just want to make sure it will come out easily later on.
 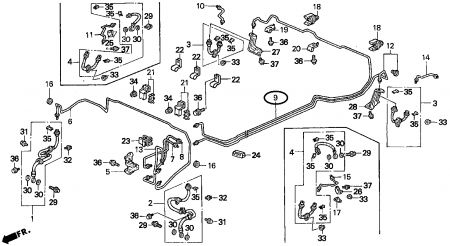 Avoid brake fluid coming in contact with rubber or plastic materials. Bending is fairly straightforward, as youre essentially just wrapping a tube around a smooth filleted corner. First class. Thanks. Follow proper safety procedures when jacking up a vehicle. "Clear and detailed. Now to be honest, I don't think you really save very much with this service, which you should because this service doesn't have the rent overhead of a standalone shop. De-burr the cut line by simply sticking it in the center of the line and rotate back and forth until the burr is gone. He confirmed everything that other shops said, including pricing. The distribution blocks can be identified by the multiple brake lines running into them. The best part is not that he's honest, but you can actually sit and watch every little thing that he does. For the flare, this is a double flare connection. Apply a small amount of oil to the end of the die which helps with achieving a high quality flare. There are various dies available based on what size line is used which is determined by which fits best within the inside of the line. The final flare done and ready to be installed. Simply insert the brake line into the appropriate hole in the vice. Clean all the end connections of the hard lines, at the distributor and at the brackets for the soft rubber hose connection, with brake cleaner to remove any dirt. Find the brake line distributor at the rear of the car where the two hard lines split off to each wheel. If you find this on your car, loosen the 10mm bolt on the bracket. Line up the slots so the hose cant rotate. Replacing the hose typically doesnt require any expensive special tools, so you can save yourself some money by doing the work at home. Use an 11mm line wrench or open end wrench to loosen the connection for the driver's side brake line at the distributor.
  Replacement lines will vary, you can buy a length or buy a roll depending on the material. Did they actually do the transmission flush? Then, remove the hoses from your brake calipers or wheel cylinders. Youll need to disconnect your brake hoses from the brake system and remove any brackets or bolts connecting them to the vehicle. Allowing for those that say it will then OK I'll replace them in another 50 years with new copper ones . Ive been working on my $600 Moab Jeep for months now, trying to get it ready for the inevitable shit-show that will be the 1,600 mile road trip from Michigan to Utah. Block off any wheels that are left on the ground if you are not replacing all the hoses. Bleeding brakes removes trapped air from the car brake system and flushes old fluid and contaminants. Super smart washingWhen you preorder the new Bespoke AI Washer and Dryer, you receive $500 in Samsung credit back. Just remember: everything on the internet is always accurate. Radiator flush? Using a line wrench is recommended, as they are able to grab onto a larger area of the hex which prevents it from stripping. Whether it is because of corrosion, rust, rounded off nuts, or damage from road debris there may be times when you need to replace the hard lines in your brake system. Choose the adapter for that size brake line, and use the thickness (or first step if it has two steps) of the base of the adapter (which Santiago is holding in his hand above) to determine how much the brake line should stick out from the vice. Jason was a lifesaver. Next is removing the line from the master cylinder that goes to the drivers side. Youll need this because if you try to cut a brake line with a shear, youll just squeeze the end shut. Well, I havent, but it. Lightly tighten it again so fluid doesnt leak out. Car brakes are essential to safe driving. This guide will start on the driver's side line. Hyundai Elantra - Brake Hose Replacement (Driver Side Front) - Chicago, Illinois. Step 1: Lift the car onto jack stands. By signing up you are agreeing to receive emails according to our privacy policy. See the brake flush/bleeding guide for help with this. Step 1: Screw the new hose into the caliper. If you don't have a solid understanding of, and experience working on, the brake system, leave this job to a proa mistake can cause your brakes to fail, which could be catastrophic. Ensure everything is tight and finally we can move onto bleed the system. Step 1: Check the fluid level in the master cylinder. These connections can be tight if they havent been changed for a few years. Yes, its amazingly cheap, and even better: its amazingly easy. Install the fitting first, the side which is being flared must be on the chamfered side of the clamp. ". Brakes are nothing to take a chance with. As good as using manual. ", "The thorough step-by-step instructions helped.". Nice! Yes a standard copper line will fail under the pressure of the hydraulic brake system, therefore it cannot be used. Ram 1500 V8-5.7L - Brake Hose Replacement (Driver Side Front, Passenger Side Front) - Hauppauge, New York. If you have some mechanical experience, you can change your vehicles brake lines at home. Step 5: Crack open the connection going into the brake caliper. This is a job best left to a pro. This is located directly up from and behind the rear differential. They differ in wet and dry boiling points. ", "Very useful information. Step 3: Retighten the nut on the top connection. Note that this line may be routed through a bracket that holds both the hard brake line and the hard fuel line from the fuel tank in place with a rubber buffer. Loosen it from the distributor. The line should be exposed the same thickness as the large side of the die. Its actually a cheap and easy job; heres how you do it. Hard line to front of car, connects to master cylinder. Before driving your car you will need to bleed the system to remove the air that has been introduced. First day was the $70 diagnostic. Its best to use a bender so you dont risk kinking the line. Genaro was absolutely great. Step 8: Unscrew the hose out of of the caliper. Inspect the hoses on a regular basis to keep your car safe to drive. If you use a normal, open-ended wrench to loosen them, there is a good chance youll round off the connections which will mean much more work. At my local OReilly Auto Parts store, they charge about a dollar per foot, and we only needed about 13. I guess the convenience makes up for it. Not what is found on say a housing application for water lines. Be careful around the brake fluid, and wear protective gloves and safety glasses while doing the job. The brakes should feel hard since we just bled the system. Finally, youll need to drain and replace the fluid and bleed the air from each line. My old brake line was really, really nasty. Nice. I need to change my hard brake lines on my 1981 Mercedes 300SD. You should only have to bleed the lines that you replaced. Thanks to all authors for creating a page that has been read 218,023 times. Over time brake lines are exposed to the exterior elements and eventually they will rust away, creating a rupture, therefore losing braking power. Share it with us! saturn brake rear brakes 2001 2000 sl2 sc2 shoes replace drum problem 2carpros sponsored links fig You may begin on either side. Begin by removing the soft rubber hose where it connects to the hard line. If you are experiencing any difficulties with this job, our certified technicians are always available to assist you.
Sitemap 18
rear brake line replacement

rear brake line replacement