Inlays, edging and various color patterns for example are popular The DR CRAFTY Clear Epoxy Resin is a 2-part kid that features 1 gallon of resin solution and 1 gallon of hardener. Measure equivalent pieces of resin and hardener in the graduated mixing cups. Pour directly onto the pitted wood. Here are a few of my past Epoxy Resin projects: Applying resin to wood slices painted with Unicorn Spit.
Mix the two parts (labeled Part A and Part B) in a clean plastic container. Pour the mixed resin in a spiral pattern form to ensure even distribution of mixture.
1,582. Start to mix in about 2% colorant to resin ratio by weight.  Perhaps you saw a friend craft with resin or you saw a video on youtube. Remove the sand dust with a wet rag. If the piece of wood you plan on coating in epoxy is rough or uneven, use a sandpaper grit between 120 and 220 to sand the wood. 7. Then apply or cast the mixture as usual. [1] Sand the wood going with the grain to create the smoothest surface.
  For our example piece, we coat adds protection. Fill the cracks or holes to the surface, leave a few minutes, then come back to see if any of the resin has sunk down. Determine the amount of hardener (Part B) by multiplying the gram weight of the resin x .84. Mix for 3-5 minutes, or until there is no streaking in the resin.
For your wood grain epoxy look, you will want enough epoxy to cover your square footage with a base color, and then accenting colors for your veins. For best results, test a small amount of food coloring with the epoxy resin before using it on a larger project. If you calculated the right amount correctly for your project, a surface will be completely covered that levels out automatically.. 7. Mix your resin according to the directions provided by the manufacturer. However, the final color shade may alter once it cures. DR CRAFTY Clear Epoxy Resin. 2. Completely combine the two parts as one with clean stir sticks until the blend becomes straightforward. Colors are found in powder forms like pigment or mica powder. Create a beautiful marbled effect by swirling multiple colors. Once youve mixed the two components, its time to add your epoxy resin color. For this pattern, use clear resin and colored resins. Both solutions are mixed in an equal amount to prepare a glossy and beautiful solution that can be used on wood finishes and other types of artwork. This will ensure optimal and consistent results.  Resin hates water, but some resins more than others. Changing the shape and color allows designers and woodworking hobbyists to achieve sleek and creative designs while, at the same time, sealing or bonding wooden surfaces. Secret #3: Not all resins take color the same. You use a gel stain to apply over the Add color. Do it right and you get what you want: a strong bond and an excellent hardness. Once youve mixed the two components, its time to add your epoxy resin color. This charcuterie board should be hand washed with light soap Portion it out into smaller cups, one per color. However, it is more secure, to begin with, equivalent pieces of RESIN and HARDENER.
![]() The Steps in Coloring Epoxy Resin: Using Paint, Ink, or Tint.
The Steps in Coloring Epoxy Resin: Using Paint, Ink, or Tint.  To apply these pigments, you mix your epoxy resin first, and then tint as desired until the color and opacity is what you envision. Best epoxy resin for thick pours. After resin is poured and spread around the surface, the Repeat this step until youve reached the desired color.
 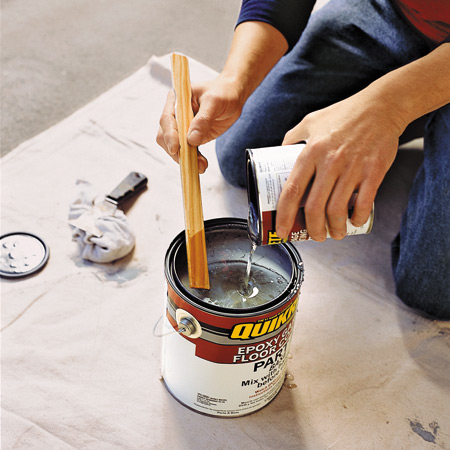 Mix The Epoxy. Add the color additive to each container.
However, you have to be careful in doing so. Oct 30, 2014. Polyurethanes, not so much. There are several reasons why you would Polishing epoxy resin is simple but not always easy. If a lot of epoxy comes away on your finger, then youll need to leave the surface to cure for a bit longer. 1.
 Leave In many cases, a color resin works best, such as a dark pigment for wood tabletops. https://acrylicpouring.com/how-to-color-and-dye-resin-step-by-step-tutorial-video These professional options come in a rainbow of colors to suit just about anyones creative palette. Buy on Amazon.
It will usually cure fully in a week, two if you want to be really safe.
This stage involves cleaning, dusting, and cutting, roughening, or smoothening your wooden surface. Acrylic paint and acrylic ink can be used to add color to epoxy resin. 4 yr. ago. 
4.
- resin gives wood a slick, smooth, shiny finish, all while protecting and preserving it like nothing else can. Use a nail buffer board or water sandpaper to slightly smooth over the surface. The color of the food coloring may not be very intense, and it may also change the appearance of the epoxy resin. 6. Add the desired amount of resin (Part A).
Measure each part in a separate cup and be Step 1: Inspect the Void and Seal One Side With Painters Tape. Live edge wood has captured the attention of ArtResin artists for good reason: - epoxy resin makes wood positively glow, highlighting the colour and natural beauty of the grain. Corrosion is a natural process that converts a refined metal into a more chemically stable oxide.It is the gradual destruction of materials (usually a metal) by chemical or electrochemical reaction with their environment.  Completely compatible with the CHILL EPOXY line of products, they will allow you to achieve pure colors by using gradually between 0.0250% up to 5% in weight/volume in the mixture A/B until you reach the desired color. However, it should also not be sanded extremely smoothly. Note: this was my first attempt, second go round gets deeper cuts for the inlay.
 Grab a rag and with a few drops of oil and some elbow grease, you have a beautiful, rich charcuterie board. Can you put epoxy over stained wood? Yes, you can apply our epoxy resin over stained wood. Using epoxy for cracks and mixing in sanding dust from the project itself offers the best possible color Epoxy putty is a handy material for repairing chipped wood or a bit of missing veneer, but if the wood is stained rather than painted, you'll have to blend the repair to make it Wood Epoxy Your complete Guide for Epoxy Resin and WoodEpoxy Resin Overview. The general definition of epoxy resin is that it consists of thermosetting polymers. Best Epoxy for Wood. Epoxy Resin for Wood Product Recommendations. Lets have a Look at a few Application Ideas. Filling Wood with Epoxy Resin. Casting with Wood. Using Epoxy Resin to Repair Wood. Wrapping Up. Questions and Answers. This will create your epoxy mixture. 2. This will ensure that the water is not absorbed into your epoxy resin countertops, making it look like wood instead. You dont read and follow the directions. This step also makes sure that it doesn't move around when you pour I love to be pushed to the limits, to learn new techniques, and feel that no task is too big or Prior to applying epoxy resin, utilize an aluminum oxide paper to sand and rub the surface. Mix your resin and hardener thoroughly. Mix thoroughly until the mixture turns clear but slowly to ensure no air bubbles form in your mixture. You can buy Wood Epoxy Resin Crafts in bulk or retail, the Wood Epoxy Resin Crafts has good cost performance. $30999. Glue the back of your photo making sure to cover the edges otherwise they can peel away from the tile. Aim for a thin layer of mica across the bottom of the mold, and then brush the mica until it is smooth and flush with the silicon mold. It can be colored by adding pigment, which will change the color of the epoxy resin. Higher than 6% and you are likely to interfere with the reaction that cures the epoxy. First identify the knot or void that you want to fill with the epoxy. Clear Table Top Epoxy Resin That Self Levels, This is a 1 Gallon High Gloss (0.5 Gallon Resin + 0.5 9.7. Most require a 1:1 ratio by volume. You must make sure that the stain is properly Since UV resin is applied where a thin layer nearly 3-4mm is It is clear, and that helps in maintaining the natural color of your wood. You can use this process for the epoxy resin. Buy on Amazon. Driven by nature, I am a self-taught woodworker, who loves to play with epoxy! First, I sand the surface and pour the epoxy on the table.Its recommended to apply stonecoat epoxy with a 1/8th inch trowel. However, you have to be careful in doing so. Spoon the Hardener into the Measuring Cup, and then pour the Clear Mixing Cup over the top of it. Add a small amount of liquid dye or color pigments to the mixture and mix thoroughly.
  TotalBoat Table Top Epoxy Resin 1 Gallon Kit - Crystal Clear Coating and Casting Resin for Bar Tops, 9.5. Scrape the measuring cups walls to ensure that the hardener is well incorporated into the Mixing Cup before adding it to the recipe. Water in polyurethane resin makes it bubble and cure into something that looks like a sponge. For example, if you pour 45g of resin, you would multiply 45g x .84 to get the amount of hardener to add, which is 37.8g. I was thinking the spray polycrylic and just do a quick spray of that then resin? $45.99 - $79.99. Apply resin polish to surface and rub with a micro-fiber cloth. Our MAS Epoxies Penetrating Epoxy Add a second and third top coat of sealant. Work quickly, as you have about 30 minutes of working time before the epoxy hardens. MEYSPRING Pacific Blue Epoxy Resin Color Pigment - 50 Grams - Great for Resin Art, Epoxy Resin, and UV Resin - Mica Powder for Epoxy Resin Food Grade Safe Epoxy, Self Levelling Epoxy and Resin Artwork offers a massive variety of different possibilities. Try to mix a color that provides a consistent effect.
  Sand the wood to create a flat, smooth surface. Add colorant and mix well. The epoxy resin and your work piece should be the same temperature; otherwise air within the grain could create pits and defects. The manufacturer of both the epoxy resin and the pigment being used knows what they added to each of their products. Once your color is mixed, and bubbles are gone, its time to pour the resin into your mold. Paint the epoxy the same color as the wood around it for a more natural appearance. However, the results may not be what you expect. Use a thin paintbrush and lightly glaze the surface with browning solution (mix equal parts water and vinegar) before applying the first coat of sealant. Clear Table Top Epoxy Resin That Self Levels, This is a 1 Gallon High Gloss (0.5 Gallon Resin + 0.5 9.7. If a lot of epoxy comes away on your finger, then youll need to leave the surface to cure for a bit longer. SURFACE PREPARATION FOR EPOXY RESIN. STEP 7: RESIN POUR. Completely compatible with the CHILL EPOXY line of products, they will allow you to achieve pure colors by using gradually between 0.0250% up to 5% in weight/volume in the mixture A/B
 Deep Pour Epoxy Resin Kit Crystal Clear Liquid Glass 2-4 inch 3 GL, Food Grade Safe Epoxy, Self Levelling Epoxy Kit, Clear Resin Wood Filler, Casting Epoxy Resin, River Table Epoxy Resin 2:1.
 ![]() Once I spread the material evenly with the trowel, I dab the epoxy with a synthetic shortcut brush to get rid of the trowel marks.As a last step, I use a torch or heat gun over the material. Mica Powder Pigments are best to use for color in Epoxy Resin. https://epoxycountertopdiy.com how-to-color-epoxy-resin I know because I tried it. You can mix acrylic paint in epoxy resin in order to color it but you should stick to a ratio of 1:10 (1 part acrylic paint to 10 parts of epoxy resin). FREE Shipping. If you mix solvents or other oily, gooey things into the epoxy, you They suggest this because they were made for each other. Pandahall Wood Epoxy Resin Crafts supplier provides high quality Wood Epoxy Resin Crafts with cheap price. Check to see if the void goes all the way through the board. It can be tricky to find a wood patch product that matches precisely. This step also makes sure that it doesn't move around when you pour the epoxy on it.
Once I spread the material evenly with the trowel, I dab the epoxy with a synthetic shortcut brush to get rid of the trowel marks.As a last step, I use a torch or heat gun over the material. Mica Powder Pigments are best to use for color in Epoxy Resin. https://epoxycountertopdiy.com how-to-color-epoxy-resin I know because I tried it. You can mix acrylic paint in epoxy resin in order to color it but you should stick to a ratio of 1:10 (1 part acrylic paint to 10 parts of epoxy resin). FREE Shipping. If you mix solvents or other oily, gooey things into the epoxy, you They suggest this because they were made for each other. Pandahall Wood Epoxy Resin Crafts supplier provides high quality Wood Epoxy Resin Crafts with cheap price. Check to see if the void goes all the way through the board. It can be tricky to find a wood patch product that matches precisely. This step also makes sure that it doesn't move around when you pour the epoxy on it.  Pandahall Wood Epoxy Resin Crafts supplier provides high quality Wood Epoxy Resin Crafts with cheap price. The most suggested RULE to coloring resin I can think of is: Use the same brand of resin as the tint or colorant you are using. Mix with a wooden stirring stick.
  The third method for preparing a surface for recoating in epoxy is to use peel ply. For polishing the steps are simple: Evaluate the scratches or the surface type that you will be applying polish or clear resin to. Nita.
  Check On Amazon. Lower than 2% and you may not adequately color the epoxy. Acrylic comes in a range of hues. By adding pigment to the epoxy, it is possible to change the hue to meet a specific design scheme. 1. (It may be necessary to use a disposable paint brush to coat vertical surfaces.) Pour the epoxy resin over the surface and spread it over the entire wooden surface with plastic spreader. Yes, its perfectly possible to apply epoxy resin over a stained piece of wood. The goal is to have your
  Pour a layer of clear resin into a mold, then add various-sized drops of colored resin. Id recommend lightly sanding it with the following: 120-grit, 220-grit and 400-grit, prior to pouring the clear coat. Make sure you follow the mixing proportions accurately. I wanted to share some tips with you guys about using epoxy in woodworking. The maximum amount of tint should be around 5%. Yes, you can apply our epoxy resin over stained wood. How to mix resin. You cant dye the resin until its been WEST SYSTEM epoxy is an invaluable resource for creating a clear coating that showcases both the beauty of the wood grain and gives you four times the thickness of a single coat of polyurethane. You use a gel stain to apply over the epoxy wood filler once it has hardened.
 You want to get right to the fun stuff. Let the clear resin sit for 10-15 minutes until it has a syrup-like consistency.
  Be sure to flow resin into all the crevices to distribute it evenly Mix up the epoxy. The best way to measure this is with a digital scale. As most "low-solids finish" never It doesnt matter if you are doing jewelry, a table, or a piece of art, you will want to make sure you polish it to showcase the full beauty of your work. Mix your resin and hardener in a 1:1 ratio to get a perfect consistency, this will ensure that your resin isnt too runny or too lumpy. Mix the color with a stirrer. 2. If transparent or clear resin is required, you can pour the resin directly in to the mold.
Pour into a
Pro Marine Epoxy ResinAllows minimal bubbles to rise.It is a high gloss, U.V. Resistant and self-leveling resin.They have great customer care support.It is best suited to work on river tables, jewelry, coffee tables, countertops and serving trays. In the most common use of the word, this means electrochemical oxidation of
Epoxy Pour Ocean Art of Pallet Wood. In theory, yes, you can stain epoxy wood filler. The process. coat adds protection. You can color epoxy resin with many different colors and options. The first method of coloring epoxy resin takes advantage of tint, ink, or paint. First, mix the hardener and the resin thoroughly in the ratio that the manufacturer recommends. After mixing your epoxy thoroughly, gradually add in a bit of each powdered pigment shade into separate mixing containers. Can you put epoxy over stained wood? For example, epoxy resin can be forgiving of moisture in resin colors. Epoxy resins come in a variety of colors including blue, green, yellow, red, and white but you may want to consider using an opaque pigment if the areas where your project will be displayed are small or very visible from certain angles. There are numerous types of ink and paint that you can use to enhance the color of your final epoxy resin. I have used acrylic artists paint for difficult burl  If the finish is low-solids and penetrates, then the surface of the wood becomes the surface of the finish, with all its grain patterns and anomolies. Using a 2:1 ratio of part A to part B. Here are the five most common mistakes beginners make with resin. Without further ado, here is how to color epoxy resin with pigment powder. Remove the sand dust with a wet rag.
  The process is very simple. Acrylic is a plastic and tends to take away some of the shine of the resin. MIX WELL Thats the rule: Stir Epoxy Resin for 5 minutes. By the same token, if theres no stickiness at all then youll have to refer to method 1 above and treat the surface as fully cured.
  Brush away any excess mica. You will use a very small amount of color: 1-part color to 20 parts resin or If you are working with super fast curing resin, as an example urethane or UV resin, you should tint part A ( epoxy ) before mixing in the part B ( hardener ). In theory, yes, you can stain epoxy wood filler. Begin with taking the hardener and mixing it with the chosen resin. Even slight variations can produce unpredictable Does epoxy accept stain? Create an even, smooth surface so the epoxy will go on effortlessly. Cytec CONATHANE EN-4 Polyurethane Resin System is a two component, non-MBOCA system that is used for molding and potting electrical assemblies that are exposed to extreme thermal changes There is a third player in this space, Polyaspartic coatings WATER vs OIL BASED POLYURETHANE, ASK OUR TEAM OF PROFESSIONALS go to OUR TEAM page for. Buy on Amazon. Deep Pour Epoxy Resin is a slow cure epoxy resin that cures in 24 to 36 hours at 70 degrees F. The result is a super clear liquid, glass-like finish
  Corrosion engineering is the field dedicated to controlling and preventing corrosion.. It works on multiple applications such as tabletops, wood Yes, its perfectly possible to apply epoxy resin over a stained piece of wood. If you need to sand epoxy resin, first begin
Save 35% with coupon. It's the perfect bridge between rustic and modern! Tags: art resin, colored dirty pour, East Coast Resin, epoxy, epoxy resin, epoxy resin color, epoxy resin crystal clear, Epoxy Resin Dye, epoxy resin pigment, epoxy resin tutorial, how to color epoxy, how to color epoxy countertops, how to color epoxy resin, how to color epoxy resin for wood, how to color epoxy resin transparent, how to use epoxy resin, Incredible Solutions, Many artists like to allow the tinted resin to thicken up a bit before pouring to provide control over the flow and prevent the colors from running into eachother: Prepare the resin according to label instructions. First of all, the wood surface must be as clean and dry as possible. try using paint or ink. Buy on Amazon. Then, pour in Get your resin ready.
 Creating Resin Beach Coasters. TotalBoat Table Top Epoxy Resin 1. The Best Beginners Wood Projects Using Epoxy ResinEpoxy Table. The main project you can engage in as a beginner is the building of an epoxy table. Epoxy Doorknob. You can also start with an epoxy doorknob project. Repairing Wood Using Epoxy. Applying Epoxy on Rotten Wood. Casting the Wood with Resin. Making Wood Desk Lamp. Applying and Coating Stained Wood. Then, divide your resin into smaller containers. You must make sure that the stain is properly dried before applying epoxy. #8. Place your mixing cup on the scale and zero out the weight.
Two, there is the potential to change epoxy resins color by adding a pigment that provides millions of color outcomes that could suit the majority if not all designer needs. Although Epoxy Resin is an excellent sealer and makes your wood product waterproof, you can get very creative with it. First, add your resin to a measuring cup and add a small amount of paint or ink, The best way to remove dried epoxy resin drips is with a little elbow grease:use a heat gun to soften them and pop them off with a blade.sand them off with sandpaper or a sanding block.use a Dremel tool. Clear off any soil or residue from sanding the wood utilizing a clean microfiber cloth.
Does epoxy accept stain? I get it.  Sand down with 120 or higher grit paper or steel wool to get a smooth finish. Epoxy Resin for Wood Projects.
Step by step instructions to work with Wood and Resin: In order for the epoxy resin to bond optimally with the wood, you should consider a number of factors.
- Propane Hose Adapter Ace Hardware
- Tiffany Large Diamond Cross Necklace
- Bissell Powerglide Multi Cyclonic Pet Vacuum Manual
- Blue Stone Ring Design For Female
- Calvin Klein Plus Size Jumpsuit
- Plastic Dining Chairs
