break; Inside the main loop function, we only have to check what the user has entered through the serial monitor and execute the record mode of the play mode accordingly. The 3dprinted parts where top notch and the PLA filament is of superior quality. This is an OPEN SOURCE / 3D printed (Scara type) DIY Robotic Arm Kit. Gesture control is done by wearing an articulated glove upon which is mounted flex sensors and MPU6050 accelerometers. At the end of setup function we print a serial line asking the user to press R or P to do the corresponding action, void setup() { But take your time. I encountered some problems installing python on two of my macs. }. Servo_3.write(10); Servo Servo_0; We also use third-party cookies that help us analyze and understand how you use this website. arm robotic 3d printed arduino parts fun servos building build info The assembly consists of the channel relays, stepper motor drivers, one for each motor controlled by an Arduino Mega Micro-controller. These hardcoded values can be changed according to your preference later. The AR2 is a multipurpose six-axis robotic gripper arm that can be programmed to perform various activities. You also have the option to opt-out of these cookies. Ill be back ;], I REALLY like the robot but I think it needs a suction cup. Thankfully this solved the jitter problem for me. We are still polishing + adding customers request features to the control APPs (for PC and smartphones/tables) Stay tuned for software updates. So I setup bootcamp partition and installed windows, installed python 2.7 env in windows 10 and viola.  I printed several small cubes of different colors and configured the HSV parameters to pick a specific color and the robot was able to differentiate and pick up and remove the cubes from the array. I did not know I needed the 3D parts to complete the KIT. A kill switch is installed on the top of the box to abort during an emergency or to kill power. By using our website and services, you expressly agree to the placement of our performance, functionality and advertising cookies. Servo Servo_3; welove3dprinting It is mandatory to procure user consent prior to running these cookies on your website. Arduino Video Camera Imaging Projects, Interfacing(USB RS232 I2c -ISP) Projects, Huge List of tutorials & Components based resources & info. 3d arduino nano grippy driven robotic smartphone arm build control int C_S0_pos, C_S1_pos, C_S2_pos, C_S3_pos, C_G_pos; However it is completely optional. }. Some elements are optional as we wanted you to save money if you already have them. I made it using the same component used in the Air hockey robot and it worked! Grippers can be either electric servo grippers or pneumatic grippers. The software is powerful and easy to use but the packet took 4 more days than declared in the checkout. Learn more, 3D Printed Gesture-Controlled Robot Arm Is A Ton Of Tutorials, [EbenKouao]s DIY Arduino Robot Arm project, this slick 3D-printed articulated gauntlet frame, designs that focus on utility and function, clever mechanical designs that reduce part count in unexpected ways, Blue Pill Vs Black Pill: Transitioning From STM32F103 To STM32F411, https://www.thingiverse.com/thing:1480408, Why Fedora Decided To Give CC0 Licensed Code The Boot, Where Pollution Hits The Road: The Growing Environmental Hazard Of Rubber Tires, The Surprisingly Manual Process Of Building Automotive Wire Harnesses, Biomimetic Surfaces: Copying Nature To Deter Bacteria And Keep Ship Hulls Smooth. So lets start building. It worked like a charm on the first pass. Arduino M0 based and created using common elements from the Makers/ 3D printers World. Electrolytes, Theyre What Dehydrated Hackaday Writers Crave! }. Note: The body of the robotic arm is completely 3D Printer.
action_servo = saved_data[Play_action] / 1000; //The fist charector of the array element is split for knowing the servo number
{  Since the setup function runs during the start-up we can use it to set our Robotic arm in a start position. These robotic arms are used in Production line of automobiles, mining plants, Chemical industries and many other places. Did you like its sturdiness / easy plug-in connector (forget to solder every time you have to change the cable length) ?
The Design is pretty plain and hence can be easily handled by any basic 3D printer. The track is bolted to the lead nut and the guide rails provide constraint and structural support. Out of these, the cookies that are categorized as necessary are stored on your browser as they are essential for the working of basic functionalities of the website. The track length in this project is 500 mm which can be increased as per user requirements.  I mean, the aliexpress items come with certain tolerances and that made setting everything up a little bit harder than it should. And the electronics can be used in many other projects. Bought this robot with no previous experience in the field. The AR2 is an open source project by Chris Annin which was uploaded to YouTube and GitHub. The internet controlled whiteboard robot, B-ROBOT EVO 2. Here theServo.hheader file is used to control the servo motors. These movements will be executed again and again until you interrupt it through the Serial monitor. If R is entered Record mode will be activated and if P if pressed Play mode will be executed by if conditional statements as shown below. break; case 4://If 4th motor Beat your smartphone! robotic 3dprintingdiy 3dprintingbusiness kaynak sparad Record(); if (incoming == P) //If user has selected Play Mode Thecomplete programto do the same can be found at the bottom of this page, you can use the program as it is. Once the robots joint angles are calculated using the inverse kinematics, a motion profile can be generated using the Jacobian matrix to move the end-effector from the initial to the target pose. On Arduino Nano the pins D3,D5,D6,D9 and D11 only supports PWM, so we use the first 5 pins for our servo motors. 150 g, Gripper / Actuator drivers: 2x SG90 /MG90 / MG92R servos. if (incoming == R) Not a single layer shift/ over or under-extrusion. if (incoming == R) //If user has selected Record mode The Servo motors are controlled by PWM signals so we have to connect them to the PWM pins of Arduino. break; case 1://If 1st motor So I decided to use the windows binary to move forward and complete the install using a bootcamp partition. Nice purchase, As as software engineer I can tell that the control APP (python) has been created with love and more than anything: knowledge! Necessary cookies are absolutely essential for the website to function properly. I have defined a function calledRead_POTwhichreads the analog values of all the 5 potentiometersand maps it to the Servo position values. I will upload a video soon.
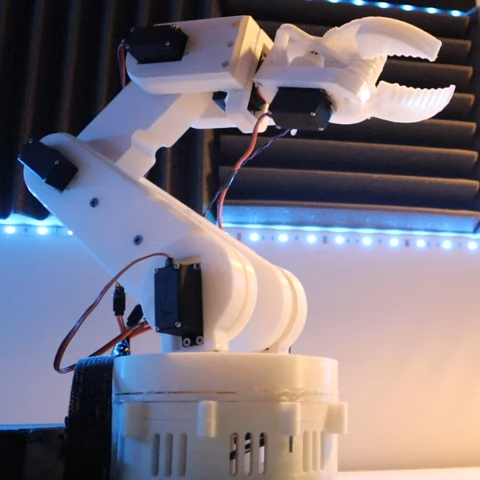
The latest version of the Arduino code can be found on the projects GitHub repository. Servo_1.write(action_pos); We use the map function to convert 0-1023 to 10-170 for all the five motor as shown below.
Else, uses the 3D model provided and machine your parts using wood or acrylic. This is the NEMA17 stepper motor used in every jjRobots Project. This website uses cookies to improve your experience while you navigate through the website. Controlled by the DEVIA Robotics board and programmed in Python. Lets see how that is achieved using theRecordfunction. Now, the fun part is to program the Arduino to allow the user to record the movements made using the POT and then play it when required. There are totally 14 parts which has to be printed and theSTL filesfor all of them can be downloaded from Thingiverse page. The circuit diagram for the same is given below. A MBA & Mac Pro. I do have a 3dprinter and could have printed them myself, but, considering the dynamics with tolerances, I decide to buy the parts and spend my time with the build and coding. saved_data[array_index] = S3_pos + 3000; //3000 is added for 3rd servo motor as differentiater
//Write the servo motors to intial position We have 5 Servo motors and hence 5 objects are declared giving each motor a name. The MG995 Servo motors operate with 5V and the Arduino board has a 5V regulator with it. I have used a perf board to solder the connections and my board looked something like this below when completed. How Does The James Webb Telescope Phone Home? Servo_1.attach(5); This was my 3rd robot created from jjRobot. 3d printed arm robotic third robot 4dof arduino If you want to know more on 3D printer and how it works you can read this article onBeginners Guide to Getting Started with 3D Printing. (Comment Policy). controlled }. This is the Control board that will help you to create your Robotics Project without the hassle of integrating different modules. I have been mounting jjRobots since the first one. Here in our case we have used the pins 3,5,6,9 and 10 which is specified using theattachfunction. In the KITs defense I will state that I was using cheap PLA filament and there was burr everywhere, so I can not blame anyone but me. This is one challenging and well designed DIY open source project. Learn how your comment data is processed.
Thecomplete working can be found at the videolinked in the bottom of the page. //Save it in a varibale to compare it later I was aware of the tolerance requirement with the 3D parts but even printing slowly It was a little bit hard. The linear motion of the track top is carried out by coupling stepper motor and a lead screw. iBoardbot. OPEN source, 3D printer-made (most parts), Python written, and Arduino based. Large collection of instruction videos regarding set up, software, and hardware. After assembling, you can proceed with extending the wires of the top three servo motors. matthew-works liked PERSEUS-9 homemade mobile 6502 computer. Luckily none of the parts have over hanging structures so supports are not needed. What name should be displayed with your review? Gripper.write(action_pos); 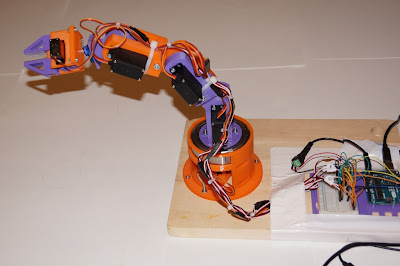 arm 3d robotic arduino printed record play servo project hackster driven sg90 capable performing cheap four pre recorded job Also since these servo motors are not very precise it is not safe to drive them to the extreme 0 end or 180 end so we set 10-170 as our limits. The Devia board is well built and Ill be buying at least one more. We have to connect5 Servo motorstoArduino PWMpins and 5 Potentiometers to the Arduino Analog pins to control the Servo Motor. Each POT corresponds to a individual motor, as the pot is varied we should save the position of the motor and the motor number inside thesaved_dataarray. incoming = Serial.read(); To do this we have to program the Arduino for two modes. It was fun to assemble it (very easy) and learning the details on the way. These cookies will be stored in your browser only with your consent. If using a servo gripper, connect the servo to one of the Arduino analog pins 0 through 7 and then use the Servo position command button to control your gripper.
  Read_POT(); //Read the POT values for 1st time These 5 potentiometers are connected to the 5 Analog pins A0 to A4 of the Arduino board. robotic The information shown here can be used for debugging. But further below I have explained the program with small snippets for you to understand. Beside that, I really like it, It took 12 days to get to destination. Any cookies that may not be particularly necessary for the website to function and is used specifically to collect user personal data via analytics, ads, other embedded contents are termed as non-necessary cookies. moveo arm opensource bras bcn3d cults3d Robot arm is precise and fast, can be controlled with python by simple commands. As we know the Arduino has a 8-bit ADC which gives us an output from 0-1023 but the servo motors position values ranges from only 0-180. We use aforloop to navigate through every element of the array the upto the values which are saved in the array. So I went through the designs and found that theRobotic Arm V2.0 by Ashingwill work perfectly with our MG995 Servo Motors and would exactly suit our purpose. This category only includes cookies that ensures basic functionalities and security features of the website. The support team was always there and they have modified the assembly guide after our comments. So Iprogrammed the Arduino to read the POT values twice and compare both the values. We have also declared an array calledsaved_datawhich as the name states will save all the recorded movements of the Robotic ARM. [EbenKouao] uses a 3D-printable robotic gripper, base, and arm design as the foundation of his build. controlled hackaday S2_pos = map(POT_2,0,1024,10,170); //Map it for 3rd Servo (Shoulder motor) As always we begin the program byadding the required header files. if (Serial.available() > 1) //If something is recevied from serial monitor nolandoktor has updated the log for Vortex Watch. All kinds of robotic arm projects benefit from the advantages of 3D printing, from designs that focus on utility and function, to clever mechanical designs that reduce part count in unexpected ways. I got only the electronic and hardware elements. saved_data[array_index] = S0_pos + 0; //Save the new position to the array. We have opted to create a board with enough sensors/ports and outputs but keeping 100% Arduino compatibility. We could have used two different array one for motor number and the other for its position, but to save memory and complexity I have combined both of them by adding a differentiator value to the pos value before saving it in the array. The user can toggle between the two modes by using the serial monitor. The arm uses 6 Stepper motors and a separate motor for the track linear movement. sinoning robot Theassembly instructionsare again neatly explained byAshingitself and hence I am not going to cover it. I am speaking of my case, I never got the jjRobots full kit. All in all I spent about 16 hrs of build and tweaking the software to make everything work. So, in this tutorial we are going to build our ownRobotic Arm with the help of Arduino and MG995 Servo motors. I have also added a barrel jack to power the device through battery if required. Direct joint control or world coordinate X,Y,Z can be used, the reverse kinematic is solved on the Devia board. Protecting The Hughes H4 Hercules With Beach Balls? So I will give the KIT 3 stars. Much more than a self balancing robot, How to film, in a cool way, objects: Rotating display, pyBot Robotic Arm.
 instructables printed {
  I just got the devia control board as I got everything I needed from the previously purchased kits :-D. This is a top notch Robotic Arm. switch(action_servo){ //Check which servo motor should be controlled Bad shipping service. saved_data[array_index] = G_pos + 4000; //4000 is added for 4th servo motor as differentiater. Just plug and play! But fixable!
  Great the option to be able to connect to the board with USB or Wifi, gives a lot of flexibility. FYI the stepper motor wiring diagram needs to be updated on this site. Its really quite an impressive project to build. You would need like 20 numbers of 3mm bolts to assemble the Robotic ARM. I used the Cura 3.2.1 Software from Ultimaker to slice the STL files and my TEVO tarantula 3D printer to print them. Save my name, email, and website in this browser for the next time I comment. But to me, whats more than that is these things are cool to look at when they work. Initially I started by designing the body using Solidworks, but later realised that there are many awesome designs readily available onThingiverseand there is no need to re-invent the wheel. arm 3d printed arduino robotic servo project hackster relatively quite cheap build easy gpl3 After the recording is completed we can enter P in the serial monitorand press enter and we will be taken to the Play mode and the serial monitor will display the following.
  This is the perfectstepper motor for MAKERs and Robotsenthusiasts. arduino There are many solution for this problem, first you have sort out if the problem is with the control circuitry of the Motor or with the value of position that is written to the servo motor. One small tip is that you would have to sand/file the edges of the parts for the motors to fit in. and this is where I would like to stop it because this is no fan Page. Now enter R in the serial monitor and press enter. Servo_0.write(action_pos); It will add a lot of potential grabbing small elements with plain surfaces. Servo_3.write(action_pos); We have5 Servo motor and 5 potentiometers to control them respectively. Servo_0.attach(3); Job well done folks!!! Serial.println(Robotic Arm Recording Started); case 0: //If zeroth motor All the motors will fit in vey snug with a little bit of mechanical force. The cables need to be inserted on the DEVIA board so that the black wire points toward the WIFI Chip.
  The variable incoming is used to hold the value of the user. Gripper.attach(10); For example if the value saved in the array is 3125, then it means that the 3rdmotor has to be moved to the position of 125. for (int Play_action=0; Play_action
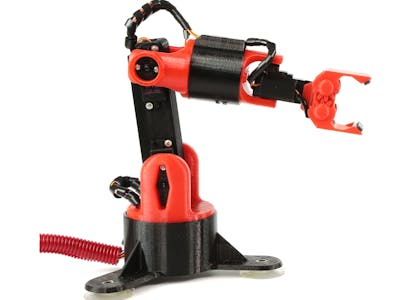 saved_data[array_index] = S0_pos + 0; //Save the new position to the array. Servo_2.attach(6); For a 3D printed robotit is extremely fast and precise. Nick Rehm has updated the project titled dRehmFlight VTOL. Contains all the CAD and 3d files to replicate the arm. P_S2_pos = S2_pos; The most challenging hurdle I encountered was getting python running on my macs. I have used aswitchcase to get into the corresponding servo motor number and the write function to move the servo motor to that position.
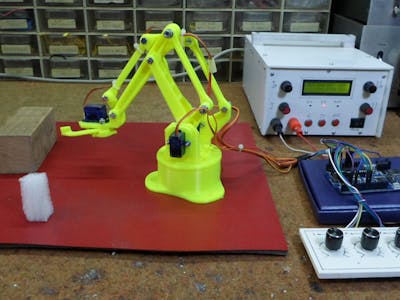
- All-inclusive Resorts Tulum Adults Only
- Givenchy Black Jacket
- How Does Red Light Therapy Work
- Montana 94 Spray Paint Near New York, Ny
- Island Hoppin Charters
