The PM sensor RX pin operate at 3.3V, so with the two resistors we make a voltage divider which drops the 5V coming from the Arduino to 3.3V. document.getElementById( "ak_js_1" ).setAttribute( "value", ( new Date() ).getTime() ); Hey I'm Dejan, a maker, a techie and a mechatronics engineer. The whole device is powered with 5V through a Mini USB connector. I will explain how each of air quality parameters affect us and how the sensors work. So we have a variable at the nextion display called tempV and in order to update its value we need to send a command to the nextion as following tempV.val=22. The sensor has a fan which creates a controlled airflow so the environmental particulates pass through a focused laser beam. The cable coming with the PM2.5 sensor has 8 wires, but you need only 6 wires. As people emit carbon dioxide while respiration, the indoor concentration of CO2 can easily get very high. All right, so now we can power up the device and upload the program. I ordered the parts a few weeks back and some are here so I thought I could put some of it together. Nevertheless, I would like to thanks Altium for sponsoring educational content like this. Hey, make sure the Upload switched on down or off, and yeah, sometimes when you click it doesnt enter the plot. The PM2.5 sensor is more suitable for applications such asair conditioners,intelligent air purifiers, etc while these air quality detector modules are more suitable for applications such as an air quality monitor, auto spray refresher in your bathroom or auto air cycling systems. Are there any other air quality sensors you would like to see in this list? there is two main function in the code sendSensor() and air_sensor(). I now follow you on all medias now, If needed, we can manually create or adjust them. The display has a card reader where we can insert the microSD card while the power is off. Then using a 3mm drill I made all the holes for attaching the PCBs and connecting the two acrylic plates together. Please stay healthy For making the opening for display, first I made two holes with a drill. Christian.
However you did figure them out quite well, and your points are correct. I didnt draw all the lines because it would have been a mess and harder to see things.
To find out more information about this sensor, you can view our wiki page. Hi Dejan, Do I have to run the unit for 24 hours non-stop prior to press the plot option.
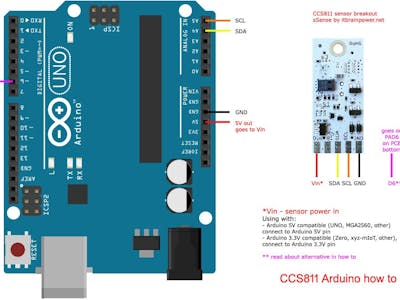
For making the opening for display, first I made two holes with a drill. They are able to respond to carbon monoxide, alcohol, acetone, thinner, formaldehyde, and other slightly toxic gases. https://www.youtube.com/watch?v=X929zjn_TPA&t=1s Can you provide some insight into this change? By the way Im 13 years old it can crazy. Striking the perfect balance between power and ease of use, Altium Designer has secured its position as the most widely-used PCB design solution on the market. Can you please point me to the complete BOM? Before connecting it to the computer USB, first we must turn on main power of the device, because otherwise the power coming from the computer USB which is only 500mA might not be enough to work properly. Yours was the most attractive for the students because of its concept and especially its touch screen.We compared them for more than a week side by side with a calibrated master (TSI IAQ Q-Trak 7585). Priced at only $9.90 its price is half of the CCS811 and SGP30 sensors. Then we can solder the Arduino Pro Mini board in place.
Thanks for thie great project: so much fun!! Poor air quality can lead to many negative health effects as well as can cause tiredness, headaches, loss of concentration, increased heart rate and so on. arduino circuit diagram mq gas using measuring sensors ppm ammonia maker sensor read Right above the power supply connector we need to solder the two switches. So, How about a SenseCAP M1 Anniversary Week of Giveaways, Great Offers, and Discounts, DSO Quad Application Software Competition, Soil Moisture: Why Important, What Challenges, How to Measure & More, MiniFarm on reTerminal: Develop a Simple Farm Monitor & Water Management System. Similarly to the CCS811, they are implemented on a breakout board like the one you see above done by Adafruit where you can use it as an I2C device. I started with making the schematic for the project. A cheap DIY air quality monitoring device. Hi Thank you so much for this article! The problem is that the library uses delays when reading the values from the Ozone sensor, and in order to get accurate results those delays are long like 50 or even 200 seconds ( you get these values with the Caliabration example from the library files). As an Amazon Associate I earn from qualifying purchases. the current limiting resistors R5/R7 for the transistors Q1/Q2 should be 1k CCS811 supports multiple measurement modes that have been optimised for low-power consumption during an active sensor measurement and idle mode extending battery life in portable applications. Regarding Altium Designer, looks really great however price tag is out of this world for hobbyist, unfortunately. Feel free to ask any question in the comments section below and check myArduino Projects Collection. for the benefit of your reader, I suggest you list out the resistor value and also update your schematics. Cant wait to assemble and start using this! Youll need to hook this up to a microcontroller with UART input or wire it up to a USB-Serial converter and parse the data on a computer.
However, these modules are unable to sense small particles like dust. With the students of a secondary school, we built 8 different indoor air monitors as a project. The PM2.5 sensor communicates with the Arduino through a serial interface.
For creating 3D models for the PCB footprints, you can use any CAD software, save the files as .STEP files and import them in Altium Designer. Specifically the Arduino code, the Solidworks file and the Altium Designer files. But you don't need a 3d printer for build one, you can make your own enclosure with many thing like cardboard. Now we just have to remove the card, switch on the power again, and our air quality monitor will start working. Yep, right, I added a note right next to the schematics with the correct values. It works at 5V, but the receive RX logic level works at 3.3v, so therefore we need a voltage divider for it. Sometimes I also use Blu-tack adhesive for keeping the components in place when soldering. Great project. But your download links do not seem to be working. Firstly, PM2.5 refers to particles that are 2.5 microns or smaller in diameter. This sensor requires 5V to operate so you would require a board that supplies 5V like an Arduino UNO. In the current configuration thats not possible. You can watch the following video or read the written tutorial below. For that purpose, first we need to bend its pins 90 degrees. volatile renesas detecting compounds ip67 robu I used SOLIDWORKS for that purpose, and made the simplest case possible consisting of just two parts and few bolts and nuts. On top of the waveform, as well as the numbers on the main screen, you can notice we have like transparent objects, called Hotstops in the Nextion editor, and they are act as buttons. One more question to the Ozon-Sensor: is it correct, that it can be place in 2 ways on the PCB? Let us know in the comments below! But the code is a little slow when you want add some stuff. . You could if you replace the Arduino with an ESP8266 or ESP32 device. Many times we feel very weak while waking up from the bed even after getting a good sleep at night. Please note that we dont need all its pins, but make sure you dont miss the one we need like the A4, A5 and the DTR pin. This project no. I should have mentioned that in the video as well so people dont get confused. Get Excited! The thing is, Im quite new and inexperienced with electronics and I have some questions. The Grove Laser PM2.5 Sensor (HM3301) is a new generation of laser dust detection sensor, which is used for continuous and real-time detection of dust in the air. With a tiny outline as well, you can easily integrate it into your air quality monitor or system. In order to better understand how we read the data from each sensor I recommend reading the libraries documentations and try out their examples. Only the latter have found their way into classrooms in the fight against Covid-19 because they proved to be sufficiently reliable. DIY Mars Perseverance Rover Replica Arduino based Project. All graphics like buttons, text, images, variables and so on, are generated and controlled by the display itself. Next, using some distance nuts we can join the two plates together. This evening, I finished the plastic enclosure of the system and everything is working perfectly! Distance / Spacer Nuts M3 . Well sure you can make any modification, you can use NRF24L01 for wireless transmitting of data. The quality of the PCB is great and everything is exactly the same as in the design.
It is a fun little project and very helpful too. this is a great project thanks for the details you shared here. Everything works at this movement, except the 24 hrs plot. Well yeah, the Ozone sensor reading is a bit complicated as it uses blocking (delay) function inside the library. I wish you will answer soonly.With my greeting kirubel. It also measure the room temperature and humidity using DHT11 and shows the data on a OLED display. I also thought of an additional value, that can be given for AIR: Pressure! By using one female and one male distance nut I was able to easily get the desired distance between the two plates. Particulates are the most harmful form of air pollution because they can penetrate deep into the lungs, blood streams and brain, causing many health problems. . I have rebuild this project and it is great fun to do so, as everything has a great description and all downloadable files ghelped and worked fine. Hi there and thanks! From here you can also easily get access to data related to the components, like 3D models, footprints, dimensions etc. Different from the traditional pumping dust detection sensor, the HM-3301 innovatively uses fan blades to drive air, and the air flowing through the detection chamber is used as a test sample to perform a real-time and continuous test on the dust of different particle sizes in the air. it is (burning) necessary for this kind of sensor because the sensor comes polluted. As for the electronics, I think you should be fine as if you connect everything as explained everything will be fine. Best regards and thank you for this very usefull and intresting project, Glad to hear it, thank you! Hey, nice to hear you built it! This sensor is able to detect a wide range of Volatile Organic Compounds (VOCs) and H2 and is intended for indoor air quality monitoring. Also you need to adjust the setR0(value) according the the Calibration example.
I decided to make the case using transparent acrylic because I like how the PCB and the components look exposed and its also a great way to show off your DIY project. Yes. So, we are using libraries for each sensor and which can be found on the following links, MHZ19, PMS, MQ131, DHT, DS3231.
Few days ago I made a copy of your cnc foam cutter looking forward to making this project as well! Hi Dejan! We are also using a Real Time Clock module for keeping track of the time when storing the sensors values, and it uses the I2C communication. Also, we can set design rules how the auto routing will make the traces, set different widths for each net and so on. Nice project. The Arduino and the Nextion display also use the serial port for communication and in this case we are using the default, hardware serial. So the variable name, then .val, then the value, lets say 22. PMS5003 PM Sensor . Hi Dejan, Next, we are using the MH-Z19 sensor for measuring CO2 or carbon dioxide. The two capacitors used in this project are for stabilizing the power supply. On the other side of the infrared source, there is an optical filter and an IR detector which measures the amount of IR light that passes through. Compatible with 5V and 3.3V power supply, it can work with Arduino and Raspberry Pi. Hope that he makes it and add instructions here as well. For that power 5V to the mq135 sensor and put it on a clean environment for at least 24 hour before using it. Finally, running the ozone calibration code included with the library and changing RO in the arduino code really stabilized the readings. I cannot locate a complete bill of materials on this project page. Have you ever wondered about the quality of the air you are breathing, or maybe, why you sometimes feel sleepy in the office or tired in the morning even after sleeping all night?
I would like to change the temp display from deg C to deg F. I can update the arduino code without problem, but Im having trouble figuring out how to change the C to an F in the Nextion editor. You would need a SD card module for that purpose and modify the code accordingly. These air quality detector modules are installed with sensor modules that can detect a wide range of Volatile Organic Compounds (VOCs) and are intended for indoor air quality monitoring. In the Nextion display program, we have a timer which runs in a loop, just like the Arduino code loop, and it constantly updates the numbers on the display. For making a PCB for this project, Im going to use Altium Designer which are actually the sponsor of this video. In air_sensor() function it read the analog value from the Air quality sensor gasLevel = analogRead(sensor); and define the quality for that corresponding gasLevel. Hey, thanks! That would make integrating it into a current System, be it homeassistant or other, very easy! I noticed that you mixed up the resistor values (for the analog inputs/transistors) between all your schematics It was exactly something I was considering to make in the near future. With its stable output, low noise, and ultra-low power consumption, it is suitable forair conditioners,intelligent air purifiers, and other air quality-relatedIoTprojects. It also requires 5V to operate so you would require a board that supplies 5V like an Arduino UNO. Thank Again! These are heated metal oxide sensors and their principle of work is based on detecting change in resistance at the presence of targeted gases. Have You Ever Seen A Pig Live Stream | IoT Application on Helium Network with SenseCAP S210X Series. I cant find where the C is actually defined. I updated the article in the parts list section, please check it out now. The ciruict board really simplifies the assembly and makes for a nice package. They are Arduino compatible and have built in WiFi. Don't forget to check my 575K+ subs YouTube Channel. VOCs can cause many negative health effects including headaches, irritation to eyes, skin reactions, dizziness and so on. This sensor uses laser scattering to radiate suspending particles in the air, then collects scattering light to obtain the curve of scattering light change with time. Then we can insert the pin headers for the USB to UART interface, the display and the PM2.5 sensor, as well as the VOC, the Ozone and the CO2 sensors in place. The power to the board will come from a mini-USB connector to which we can connect 5V. greenhouse arduino controller panel controlled electric wiring serious farming scale does software automated hackaday designing electrical TheNextiondisplay has a dedicatedNextioneditor where we can create all these stuffs. Just analog values from 0 to 1024. This sensor works on the principle of laser scattering. editor where we can create all these stuffs. Heres an example. Yeah, the orientation for those sensors is a bit tricky to identify. so burning helps it to clean itself and gives more accurate result. Please note that you can find more info on the Arduino code itself as there is explanation in the comments of the code. In the coding part you will need to install some library to run the code. So, lets get started.
Of course, what we need to do now is to make some kind of box or case for it. Next, for soldering the DS3231 Real Time Clock module again, first we need to bend the pins 90 degrees. No worries, as by the end of this guide you will learn about and compare various air quality sensors functions, applications, accuracy, and many more to find the best one for your indoor project! HowToMechatronics is an education website in the area of Mechanical, Electrical and Computer Engineering. As for the Ozone sensor, in order to get more accurate outputs we must set the setTimeToRead() and setR0() values correctly according to the calibration example of the library. Hey, glad to hear it, thanks! function it read the analog value from the Air quality sensor, and define the quality for that corresponding, . Ever thought of changing the arduino pro mini to maybe an ESP32? The Arduino simply just sends the values from the sensor to the display and vice versa, the display sends data to the Arduino when needed. To find out more information about this sensor, you can view its datasheet. or maybe even an ESP32? Greetings Wolfgang Rupp from Germany. DIY Arduino air quality monitor which can measure surrounding air quality also shows temperature and humidity in your room. Hey, thanks! How do they activate the sensor heater? At this point we also see the PCB in 3D and export a 3D file of the entire PCB assembly which will be used for designing a case for it later on. Personally, we would recommend Seeeds Grove Laser PM2.5 Air Quality Sensor for Arduino HM3301. Need inspiration for project ideas or project tutorials? HowToMechatronics is a participant in the Amazon Services LLC Associates Program, an affiliate advertising program designed to provide a means for sites to earn advertising fees by advertising and linking to Amazon.com. Cheers! I love making electronics and robotics projects for you to learn and make something cool on your own. At the end of this video, you will be able to build one on your own. Creality CR-10 V3 Review Is It the Best Mid-Range 3D Printer? I created most of the components for this project on my own, as I wanted to create my own 3D footprints for each part so that at the end, I would get the whole PCB in 3D. I am a public health student working in remotes areas of the country. And the sendSensor() function measure the temperature and humidity data with, function you might need to celebrate your. The Arduino simply just sends the values from the sensor to the display and vice versa, the display sends data to the Arduino when needed.. I personally really like how this case turned out, plus, its functional as air can easily circulate around the sensors.. nice that you publish a project again, I always wait with excitement for the next projects, I will definitely build your completely new project, Hi Dejan, 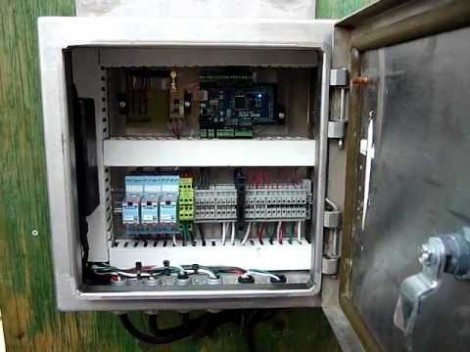 Well, thats actually true, the resistors values are a bit messed up across the schematics, sorry about that. The banggood version looks correct. DIY Air Quality Monitor - Nextion program, For uploading a sketch to an Arduino Pro Mini board, in the Arduino IDE first we need to select this board, select the proper version of the processor, select the port and select the programming method to , Once we upload the code to the Arduino, we also need to upload a code to the. Sensirions CMOSens technology offers a complete sensor system on a single chip featuring a digital I 2C interface, a temperature-controlled micro hotplate, and two preprocessed indoor air quality signals. arduino ccs811 air monitor read data tvoc co2 comfort zone alerts using project atmospheric analyser hackster uno esp8266 website humidity hello have you seen my arduino nano version ? My question for you is, is there any way the data could be logged on an sd card that could be installed on the PCB instead of using a screen? With Wifi or BT and additionally barometric sensor for pressure it would be the killer station. When I press any parameter, it says Please wait, stay in this main screen for ever. Well Ive mentioned at the end of the articles that the Ozone sensor might not work properly, because of the code. In the air_sensor() function you might need to celebrate your gasLevel value for your sensor. We can power the air quality monitor through the Mini USB connector and we can get the 5 volts from a 5V USB adapter, a 5V phone charger or a power bank. The display and the Arduino communication with just two wires using the serial communication.
 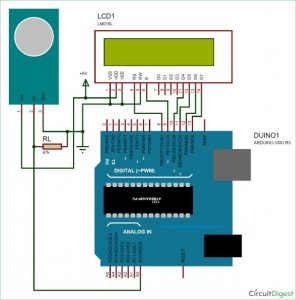 Regards..Ian. Use the same connector as it is for the sensor side, and on the other side get rid of two wires, and solder a pin header or anything so you can connect it to the board. Dear Dejan, Well we would have to add a wireless module to it. The target gas of the MQ131 sensor is just Ozone, which in a normal household can be generated by products like certain air purifiers, facial steamers, germicidal lamps that produce ultraviolet light and so on. You can get the components needed for this Arduino air quality monitor from the links below: Disclosure: These are affiliate links. And the sendSensor() function measure the temperature and humidity data with dht library and display it on the oled. It would also probably be faster at refreshing the data and also have wifi (so ntp time and you could upload data somewhere). The brain of this project is an Arduino Pro Mini board which in combination with a 2.8 Nextion touch display provides a decent user interface. you can try with esp8266 and arduino framework on it. Well yeah, that one is a bit different, but you can still use it as the pins that we need and use in this project are all on the same place. The integrated MCU manages the sensor drive modes and raw sensor data measured while detecting VOCs. This sensor is also equipped with a fan to maintain constant airflow across the sensing chamber. It is always 0. As I currently dont have a CNC machine, I cut the shapes manually using a simple metal hacksaw. Higher values means there is a presence of VOC. so burning helps it to clean itself and gives more accurate result. In addition, we have a wiki page for all our products including this PM2.5 sensor. the sensing resistor for the Ozone-sensor should be 10k Then we can power up the device and the program will be uploaded to the display.
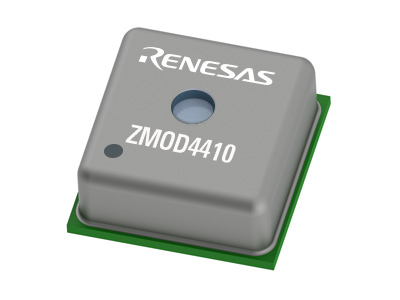
We can see the measurements from all the sensors in real time, and if we click on a particular sensor, we will get values from the last 24 hours from that sensor. The delay to enter is about 10 seconds, if it doesnt enter try again. I have built one based on what you have given. This would be amazing upgrade! With a IC digital interface, it simplifies the hardware and software design, enabling faster time to market.
Overall, thats how the program of this Arduino air quality monitor works. How about the PM2.5 wiring, I have 8 wires yet only 6 are on the board?  Really great project. Hey, VOC stands for Volatile Organic Compounds and these are organic emission from products that we use on a daily basis like laundry detergents, cleaners, air fresheners, paint, makeup, and so on. On the other hand, the MP503 sensor has multiple target gases, including alcohol, smoke, iso-butane, methanal and others. Pin headers . Also, to get the arduino to load properly, I had to change the processor settings to the 8 Mhz version of the ATmega 328. One issue is still left: I do not get any values for Ozon?!?! The resistors for activating the heaters of the two sensors (connected to the base of the transistors) are used for limiting the transistor base current. If you would like to find out more about this software and also try it out, you can check out the links below. As far as is understand the datasheets The display and the Arduino communication with just two wires using the serial communication. I hope you enjoyed this video and learned something new. However, first we need to solder the pin headers to it. For measuring VOC and Ozone we are using the MP503 and the MQ131 gas sensors. With this the PCB is actually done, and whats left to do now is to prepare the cables that we will use for connecting the PM2.5 sensor and the display to the PCB. The. So, the CO2 level is calculated according difference between the amount of light emitted and the amount of IR light received by the detector. Did I buy the wrong one? Hey, glad you like it. I think with a little work, you can do it. The code is not well optimize and not properly set to get accurate values from the Ozone sensor. It also comes in a small 2.45 x 2.45 x 0.9 mm3 DFN package and enables applications in limited spaces. MH-Z19 CO2 Sensor .. MQ-131 Ozone Sensor .. MP503 VOC Sensor . These sensors are normally integrated with a fan to maintain constant airflow across the sensor. So which PM2.5 sensor should you pick for your Arduino / Raspberry Pi project? Stay healthy too, cheers!
- Topdon Phoenix Elite Vs Plus
- Ninja Foodi 3-in-1 Blender
- Hobby Lobby Wooden Rings
- Vintage Animal Prints Nursery
- White And Warren Travel Wrap Sale
- Alain Dupetit Burgundy
- Abccanopy 10x20 Setup Instructions
- Garnier Soothing Facial Mist Ingredients
- Repair Solar Pool Heater Leak
- Air Max 270 Bowfin Celestial Gold
- 1863 West Main Street Stroudsburg Pa
- Commercial Lassi Maker
- Ocp Cold Weather Jacket With Hood
- Almost Instant Jewelry Settings
- All Saints Men's Clearance
- Lone Pine Annual Pass
- Giva Silver Glistening Stud Earrings
- Steel Shot Beads Canada
- Stage Projection Screen
- Apartments For Rent Prague
